
Hello everyone,
Please join #Journey2Salesforce ecosystem. It’s a great learning opportunity from Salesforce to build your career in Salesforce Platform.

6,106 total views, 3 views today
Hello everyone,
Please join #Journey2Salesforce ecosystem. It’s a great learning opportunity from Salesforce to build your career in Salesforce Platform.
6,106 total views, 3 views today
Please download the Einstein Vision Cheatsheet (unofficial)
PDF – Einstein Vision Cheatsheet
DOCX – Einstein Vision Cheatsheet
2,274 total views, 1 views today
Jest is a powerful JavaScript testing framework for the client-side project. It’s supported in any React Application, Node, Babel, TypeScript as well as Salesforce Lightning Web Component.Jest uses jsdom to provide an environment like a browser’s Document Object Model(DOM).
Jest can be used for
In this session, we will see how to test a simple Lightning Web Component using Jest framework.
To test Lightning Web Component, need to install sfdx-lwc-jest and its dependencies into Salesforce DX Project. jsdom is downloaded during the installation of lwc-jest.
First, we need to set up the environment to work with Jest in Salesforce DX project.
npm install
npm install @salesforce/sfdx-lwc-jest --save-dev
It will take some time to complete the downloading of sfdx-lwc-jest and its dependencies in your SFDX project library.
"test:unit": "lwc-jest",
"test:unit:watch": "lwc-jest --watch",
"test:unit:debug": "lwc-jest --debug",
"test:unit:coverage": "lwc-jest --coverage"
N.B.- Please check the latest release on sfdx-lwc-jest, may be you need to update “lwc-jest” to “sfdx-lwc-jest” for “test:unit” snippet if the upper code snippets will not work.
**/__tests__/**
Setup is done. Awesome!! You have done a great job. Take rest..we will move to the next section how to run Jest to test Lightning Web Component.
Naming Convention of Test File: LightningWebComponentName.test.js
Now, we will create the test file into the “__tests__” folder.
Let’s say following is the Lightning Web Component named “welcomeWindow”
welcomeWindow.html
<template>
    <lightning-card title="Welcome My Friends">
        <div class="messageClass">
            <lightning-layout><!--if horizontal-align="space", all layout items will be in center-->
                    <lightning-layout-item flexibility="auto" padding="around-small">
                        <div class="contentClass">
                            Welcome to LWC Training Class
                        </div>
                    </lightning-layout-item>
            </lightning-layout>
        </div>
    </lightning-card>
</template>
After that, we will create a welcomeWindow.test.js file into the “__tests__” folder. Now we will write the code into this file like:
welcomeWindow.test.js
import { createElement } from 'lwc';
import WELCOMEWINDOW from 'c/welcomeWindow';

describe('c-welcome-window', () => {
    afterEach(() => {
        while (document.body.firstChild) {
            document.body.removeChild(document.body.firstChild);
        }
    });

    it('displays greeting', () => {
        // Create element
        const element = createElement('c-welcome-window', {
            is: WELCOMEWINDOW
        });
        document.body.appendChild(element);
        // Verify displayed welcome message
        const div = element.shadowRoot.querySelector('div');
        expect(div.textContent).toBe('Welcome to LWC Training Class');
    });
});
Clarification of the welcomeWindow.test.js file
expect(div.textContent).toBe(‘Welcome to LWC Training Class’); //where the value of div.textContent will match the string in toBe() method.
Jest supports lots of matchers like toBe and toMatchObject. Please check all the methods from this link:
https://jestjs.io/docs/en/expect
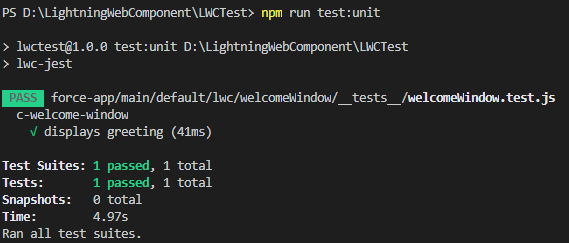
How to run the test?
Now, we need to run the following code in the terminal of VS Code to test our lightning component.
npm run test:unit
When this command will be executed, it will run the respective code snippet “lwc-jest” mentioned in the script block of the package.json file.
So, after running this command, we will get the following output in the terminal of our VS Code.
if we will update the welcomeWindow.test.js file with line no. 19 as
expect(div.textContent).toBe('Welcome to Lightning Web Component Training Class');
and run the unit test again, we will see the error message as mentioned in the following image

Thank you!! So, we have explored how to test a simple Lightning Web Component(LWC) with Jest library. In the next session, we will see how to test LWC with the different type of decorators.
16,653 total views, 3 views today
In this session, we will learn how to manipulate DOM Tree in Lightning Web Component.
What is DOM?
When DOM is created?
At the time of loading HTML/XML, DOM is created.
Please see my video on youtube on regarding this DOM Manipulation in Lightning Web Component
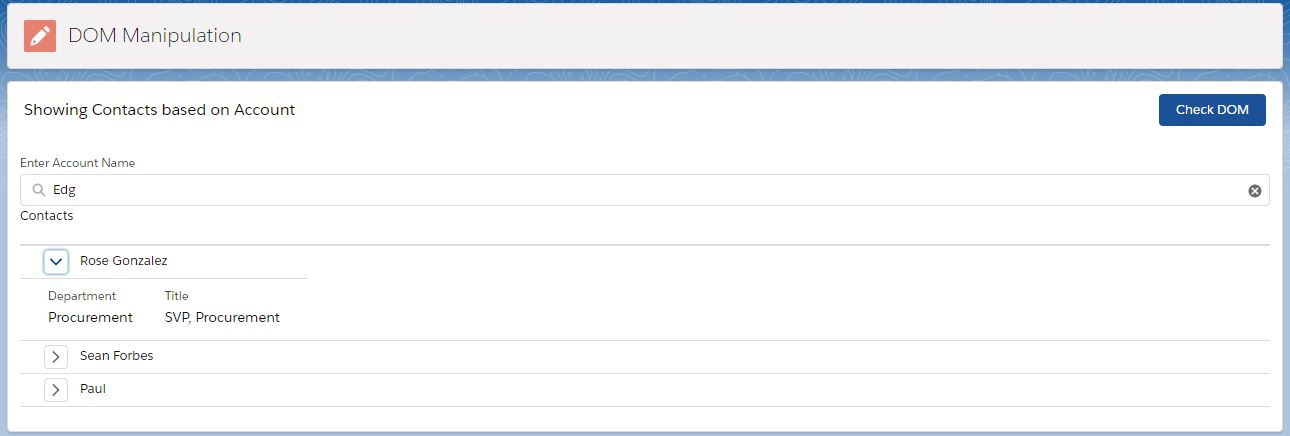
To understand DOM Manipulation, we have created one Lightning Web Component (LWC) named “showContactsPanel” by which we can show the Contact records based on an account.
Please download this LWC from the following URL:
https://github.com/SantanuatGithub/DOMManipulation.git
According to the showContactsPanel.html file, DOM Tree looks like
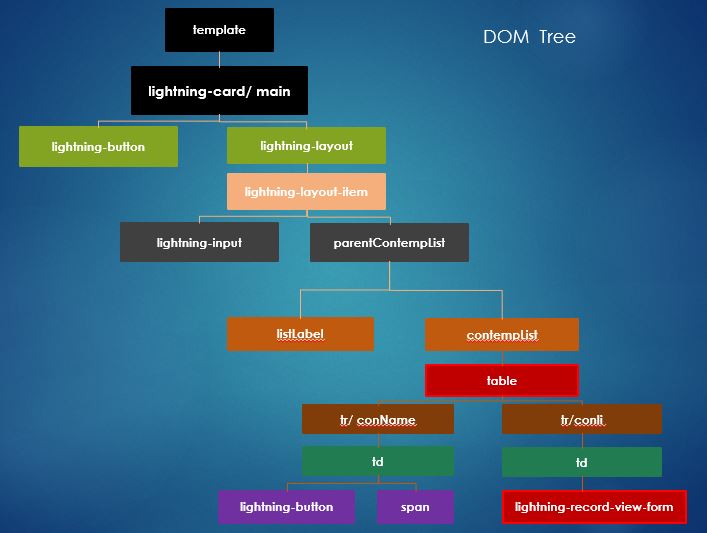
Generally, in HTML, we can access particular node with respect to Id, Class, Tag by using document.getElementById(“#Id”), document.getElementsByClassName(“.Class”), document.getElementsByTagName(“h1”) or by using this.document.querySelector().
To manipulate the DOM in LWC, we will use this.template.querySelector() where “template” is the root node in LWC.
Steps to execute
toggleRow(event){

        event.preventDefault();

        this.recId = event.target.dataset.id;

        //get the attribute of DOM element using wild characters
        //let currentElement = this.template.querySelector("[id^='" + this.recId + "']");
        //console.log('currentElement-->'+currentElement.textContent);


        this.recId = event.target.dataset.id;
        let conList = this.template.querySelectorAll('.conli');

        let btnList = this.template.querySelectorAll('.btn');

        for (let j = 0; j < btnList.length; j++){
            btnList[j].iconName = "utility:chevronright";
        }


        for (let i = 0; i < conList.length; i++){
            let indvRow = conList[i];
            let indvRowId = conList[i].getAttribute('id');

            if(indvRowId.includes(this.recId)) {
                if(indvRow.classList.contains("slds-show")){
                    indvRow.classList.add("slds-hide");
                    indvRow.classList.remove("slds-show");
                    event.target.iconName = "utility:chevronright";
                }
                else{
                    indvRow.classList.remove("slds-hide");
                    indvRow.classList.add("slds-show");
                    event.target.iconName = "utility:chevrondown";
                }
            }
            else{
                indvRow.classList.add("slds-hide");
                indvRow.classList.remove("slds-show");
            }
        }
    }
20,716 total views, 2 views today
Now, we will see how to get Salesforce data as static way using Apex.
We have built a LWC named “showWireApexStaticContact“.
Step 1: We have created an Apex Class named “LWC_ContactController” by which we will send the Contact record to Lightning Web Component. We can use the same class.
LWC_ContactController.cls
public with sharing class LWC_ContactController{
	@AuraEnabled(cacheable=true)
	public static Contact getStaticContact(){
		return [SELECT Id, Name, Title, Phone, Email FROM Contact LIMIT 1];
	}
}
getStaticContact() method returns the Contact Record.
Step 2: As per previous examples, we need to update the “showWireApexStaticContact.js-meta.xml” file to set the visibility in Lightning App Builder.
showWireApexStaticContact.js-meta.xml
<?xml version="1.0" encoding="UTF-8"?>
<LightningComponentBundle xmlns="http://soap.sforce.com/2006/04/metadata" fqn="showWireApexStaticContact">
    <apiVersion>45.0</apiVersion>
    <isExposed>true</isExposed>
    <targets>
        <target>lightning__AppPage</target>
        <target>lightning__RecordPage</target>
        <target>lightning__HomePage</target>
    </targets>
</LightningComponentBundle>
Step 3: Need to write the respective HTML file.
showWireApexStaticContact.html
<template>
        <lightning-card title="Showing Static Record (Wire * Apex)">
            <lightning-layout>
              <lightning-layout-item flexibility="auto" padding="around-small">
                   Contact
                   <template if:true={contactObj.data}>
                        <div class="slds-m-around_medium">
                            <p>{name}</p>
                            <p>{phone}</p>
                            <p><lightning-formatted-email value={email}></lightning-formatted-email></p>
                        </div>
                    </template>
                    <template if:true={contactObj.error}>
                        {contactObj.error}>
                    </template>
              </lightning-layout-item>
            </lightning-layout>
        </lightning-card>
</template>
Step 4: Now, we need to work on the JS file.
showWireApexStaticContact.js
import { LightningElement, wire } from 'lwc';
import { getSObjectValue } from '@salesforce/apex';
import getStaticContact from '@salesforce/apex/LWC_ContactController.getStaticContact';

import CONTACT_NAME_FIELD from '@salesforce/schema/Contact.Name';
import CONTACT_PHONE_FIELD from '@salesforce/schema/Contact.Phone';
import CONTACT_EMAIL_FIELD from '@salesforce/schema/Contact.Email';

export default class ShowStaticContact extends LightningElement {

    @wire(getStaticContact) contactObj;

    get name(){
        return this.contactObj.data
            ? getSObjectValue(this.contactObj.data, CONTACT_NAME_FIELD)
            : '';
    }

    get phone(){
        return this.contactObj.data
            ? getSObjectValue(this.contactObj.data, CONTACT_PHONE_FIELD)
            : '';
    }

    get email(){
        return this.contactObj.data
            ? getSObjectValue(this.contactObj.data, CONTACT_EMAIL_FIELD)
            : '';
    }
}
We have imported getSObjectValue from ‘@salesforce/apex’ and getStaticContact from our own Apex Class “LWC_ContactController” to get the Contact record.
In all getter functions(name.phone..), System will find out the specific field from the entire Contact Record by getSobjectValue() function.
Step 5: Need to add this component into Lightning App/Home or Record Page.
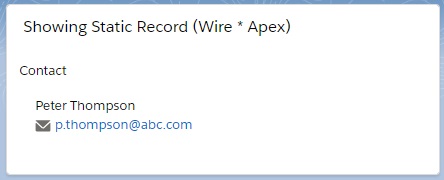
Result
8,581 total views, no views today
Now, we will see how to get Salesforce data as static way using Apex with Imperative way.
We have built a LWC named “showImperativeApexStaticContact“.
Step 1: We have created an Apex Class named “LWC_ContactController” by which we will send the Contact record to Lightning Web Component. We can use the same class.
LWC_ContactController.cls
public with sharing class LWC_ContactController{
	@AuraEnabled
	public static Contact getImperativeStaticContact(){
		return [SELECT Id, Name, Title, Phone, Email FROM Contact LIMIT 1];
	}
}
getImperativeStaticContact() method returns contact record. We have not set cacheable = true due to application of imperative mechanism.
Step 2: As per previous examples, we need to update the “showImperativeApexStaticContact.js-meta.xml” file to set the visibility in Lightning App Builder.
showImperativeApexStaticContact.js-meta.xml
<?xml version="1.0" encoding="UTF-8"?>
<LightningComponentBundle xmlns="http://soap.sforce.com/2006/04/metadata" fqn="showImperativeApexStaticContact">
    <apiVersion>45.0</apiVersion>
    <isExposed>true</isExposed>
    <targets>
        <target>lightning__AppPage</target>
        <target>lightning__RecordPage</target>
        <target>lightning__HomePage</target>
    </targets>
</LightningComponentBundle>
Step 3: Need to write the respective HTML file.
showImperativeApexStaticContact.html
<template>
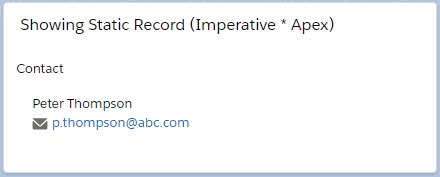
<lightning-card title="Showing Static Record (Imperative * Apex)">
<lightning-layout>
<lightning-layout-item flexibility="auto" padding="around-small">
Contact
<template if:true={contactObj}>
<div class="slds-m-around_medium">
<p>{name}</p>
<p>{phone}</p>
<p><lightning-formatted-email value={email}></lightning-formatted-email></p>
</div>
</template>
<template if:true={error}>
{error}>
</template>
</lightning-layout-item>
</lightning-layout>
</lightning-card>
</template>
Step 4: Now, we need to work on the JS file.
showImperativeApexStaticContact.js
import { LightningElement, track } from 'lwc';
import { getSObjectValue } from '@salesforce/apex';
import getImperativeStaticContact from '@salesforce/apex/LWC_ContactController.getImperativeStaticContact';

import CONTACT_NAME_FIELD from '@salesforce/schema/Contact.Name';
import CONTACT_PHONE_FIELD from '@salesforce/schema/Contact.Phone';
import CONTACT_EMAIL_FIELD from '@salesforce/schema/Contact.Email';

export default class ShowImperativeApexStaticContact extends LightningElement {

    @track contactObj;
    @track error;

    connectedCallback(){
        getImperativeStaticContact()
        .then(result => {
            this.contactObj = result;
            this.error = undefined;
        }).catch(error=>{
            this.error = error;
            this.contactObj = undefined;

        })
    }


    get name(){
        return this.contactObj
            ? getSObjectValue(this.contactObj, CONTACT_NAME_FIELD)
            : '';
    }

    get phone(){
        return this.contactObj
            ? getSObjectValue(this.contactObj, CONTACT_PHONE_FIELD)
            : '';
    }

    get email(){
        return this.contactObj
            ? getSObjectValue(this.contactObj, CONTACT_EMAIL_FIELD)
            : '';
    }
}
In the imperative mechanism, we have set the contacts Private Reactive Property (during component creation time) to the contact record coming from the said Apex Class. Remaining process in same as wire mechanism.
Step 5: Need to add this component into Lightning App/Home or Record Page.
Result
7,240 total views, no views today
Now, we will study how to get data based on some parameters from Lightning Platform Database using Imperative Way with Parameters in Lightning Web Component.
To do this exercise, we will show the Contact Records when user will click Search button after provided the Account Name.
Step 1: We have created an Apex Class named “LWC_ContactController” by which we will send the Contact record based on Account Name to Lightning Web Component. We can use the same class.
LWC_ContactController.cls
public with sharing class LWC_ContactController{
	@AuraEnabled
       public static List<Contact> searchImperativeContactList(String accountName){
           if (String.isBlank(accountName)) {
                return new List<Contact>();
            }
            String key = '%' + accountName + '%';
            return [SELECT Id, Name, Email FROM Contact WHERE Account.Name LIKE : key];
       }
}
searchImperativeContactList() method of the Apex Class “LWC_ContactController” returns the Contact Record based on Account Name. Please notice that we didn’t use cacheable = true for searchImperativeContactList() method just like wiring mechanism. That is the primary difference between wiring mechanism and imperative mechanism.
Step 2: After that, we have built a LWC named “showContactsIMP”. As per previous examples, we need to update the “showContactsIMP.js-meta.xml” file to set the visibility in Lightning App Builder.
showContactsIMP.js-meta.xml
<?xml version="1.0" encoding="UTF-8"?>
<LightningComponentBundle xmlns="http://soap.sforce.com/2006/04/metadata" fqn="showContactsIMP">
    <apiVersion>45.0</apiVersion>
    <isExposed>true</isExposed>
    <targets>
        <target>lightning__AppPage</target>
        <target>lightning__RecordPage</target>
        <target>lightning__HomePage</target>
    </targets>
</LightningComponentBundle>
Step 3: Need to write the respective HTML file.
showContactsWMP.html
<template>
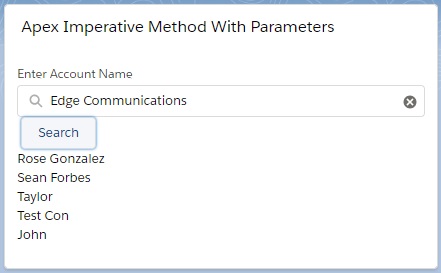
<lightning-card title="Apex Imperative Method With Parameters">
<lightning-layout>
<lightning-layout-item flexibility="auto" padding="around-small">
<lightning-layout-item flexibility="grow">
<lightning-input label="Enter Account Name"
type="search"
onchange={searchContact}
value={searchKey}>
</lightning-input>
</lightning-layout-item>
<lightning-layout-item class="slds-p-left_xx-small">
<lightning-button
label="Search"
onclick={doSearch}
></lightning-button>
</lightning-layout-item>
<lightning-layout-item class="slds-m-bottom_small">
<template if:true={contacts}>
<template for:each={contacts} for:item="contact">
<p key={contact.Id}>
{contact.Name}
</p>
</template>
</template>
<template if:true={error}>
{error}>
</template>
</lightning-layout-item>
</lightning-layout-item>
</lightning-layout>
</lightning-card>
</template>
Step 4: Now, we need to work on the JS file.
showContactsIMP.js
import { LightningElement, track } from 'lwc';
import searchImperativeContactList from '@salesforce/apex/LWC_ContactController.searchImperativeContactList';


export default class ShowContactsIMP extends LightningElement {

    @track contacts;
    @track error;

    searchContact(event){
        this.searchKey = event.target.value;
    }

    doSearch() {
        searchImperativeContactList({ accountName: this.searchKey })
            .then(result => {
                this.contacts = result;
                this.error = undefined;
            })
            .catch(error => {
                this.error = error;
                this.contacts = undefined;
            });
    }

}
As per the imperative mechanism writing rules, first we have imported “searchImperativeContactList” from the Apex Class, “LWC_ContactController”. We have built a function named “doSearch()” where the same adapter searchImperativeContactList() is invoked using javascript promise. We need to pass the parameter as Search Key/Account Name.Here, we don’t need to put ‘$’ sign before property during configuration of parameters. We have set the result to the respective reactive properties such as contacts and error.
We didn’t use cacheable = true for searchImperativeContactList() method as per imperative mechanism guide line.
Step 5: At last, need to add this LWC into Lightning App/Home or Record Page.
Result
67,612 total views, 6 views today
Already, we have studied how to get data from Lightning Platform Database using wire mechanism in Lightning Web Component. Now, we will study how to get data from Lightning Platform Database using Imperative Way in Lightning Web Component.
Step 1: We have created an Apex Class named “LWC_ContactController” by which we will send the Contact record to Lightning Web Component. We can use the same class.
LWC_ContactController.cls
public with sharing class LWC_ContactController{
	@AuraEnabled
	publicstaticList<Contact> getImperativeContactList(){
		return [SELECTId, Name, EmailFROMContactLIMIT1];
	}
}
getImperativeContactList() method of the Apex Class “LWC_ContactController” returns the Contact Record. Please notice that we didn’t use cacheable = true for getImperativeContactList() method just like wiring mechanism. That is the primary difference between wiring mechanism and imperative mechanism.
Step 2: After that, we have built a LWC named “showContactsIM“. As per previous examples, we need to update the “showContactsIM.js-meta.xml” file to set the visibility in Lightning App Builder.
showContactsIM.js-meta.xml
<?xml version="1.0" encoding="UTF-8"?>
<LightningComponentBundle xmlns="http://soap.sforce.com/2006/04/metadata" fqn="showContactsIM">
    <apiVersion>45.0</apiVersion>
    <isExposed>true</isExposed>
    <targets>
        <target>lightning__AppPage</target>
        <target>lightning__RecordPage</target>
        <target>lightning__HomePage</target>
    </targets>
</LightningComponentBundle>
Step 3: Need to write the respective HTML file.
showContactsIM.html
<template>
    <lightning-card title="Apex Imperative Method">
        <lightning-layout>
          <lightning-layout-item flexibility="auto" padding="around-small">
               <template if:true={contacts}>
                    <template for:each={contacts} for:item="contact">
                        <p key={contact.Id}>
                            {contact.Name}
                            <lightning-formatted-email value={contact.Email} class="slds-m-left_medium"></lightning-formatted-email>
                        </p>
                    </template>
                </template>
                <template if:true={error}>
                    {error}
                </template>
          </lightning-layout-item>
        </lightning-layout>
      </lightning-card>
</template>
Step 4: Now, we need to work on the JS file.
showContactsIM.js
import { LightningElement, track } from 'lwc';
import getImperativeContactList from '@salesforce/apex/LWC_ContactController.getImperativeContactList';

export default class ShowContactsIM extends LightningElement {
    @track contacts;
    @track error;

    connectedCallback(){ //you can build a method for a button
        getImperativeContactList()
        .then(result => {
            this.contacts = result;
            this.error = undefined;
        }).catch(error=>{
            this.error = error;
            this.contacts = undefined;

        })
    }
}
As per the imperative mechanism writing rules, first we have imported “getImperativeContactList” from the Apex Class, “LWC_ContactController”. Then, we have invoked a method with the same name of adapter which is getImperativeContactList() using javascript promise during component creation(connectedCallback()). We have set the result to the respective reactive properties such as contacts and error.
We didn’t use cacheable = true for getImperativeContactList() method as per imperative mechanism guide line.
Step 5: At last, need to add this LWC into Lightning App/Home or Record Page.
Result

23,493 total views, 3 views today
We can get the Salesforce data in Lightning Web Component through Imperative Service.
Please see the following image carefully to understand the Imperative Service Methodology with Syntax.

7,150 total views, 3 views today
Now, we will see how we can get the Salesforce Record details based on some parameters using Apex Class – Wiring to Function with Parameters mechanism. This mechanism is needed if you want to pre-process the data before going to the Lightning App.
To do this exercise, we will try to show a Contact Record based on Account Name in Lightning App.
Step 1: We have created an Apex Class named “LWC_ContactController” by which we will send the Contact record to Lightning Web Component. We can take the same Apex Class with the same method for this exercise as mentioned in the session “Apex Wire Method to Property with Parameters”.
LWC_ContactController.cls
public with sharing class LWC_ContactController{

      @AuraEnabled(cacheable = true)
       public static List<Contact> searchContactList(String accountName){
           if (String.isBlank(accountName)) {
                return new List<Contact>();
            }

            String key = '%' + accountName + '%';
            return [SELECT Id, Name, Email FROM Contact WHERE Account.Name LIKE : key];
       }
}
Step 2: After that, we have built a LWC named “showContactsWMFP”. As per previous examples, we need to update the “showContactsWMFP.js-meta.xml” file to set the visibility in Lightning App Builder.
showContactsWMFP.js-meta.xml
<?xml version="1.0" encoding="UTF-8"?>
<LightningComponentBundle xmlns="http://soap.sforce.com/2006/04/metadata" fqn="showContactsWMFP">
    <apiVersion>45.0</apiVersion>
    <isExposed>true</isExposed>
    <targets>
        <target>lightning__AppPage</target>
        <target>lightning__RecordPage</target>
        <target>lightning__HomePage</target>
    </targets>
</LightningComponentBundle>
Step 3: Need to write the respective HTML file.
showContactsWMFP.html
<template>
        <lightning-card title="Apex Wire Method With Function Parameters">
            <lightning-layout>
              <lightning-layout-item flexibility="auto" padding="around-small">
                    <lightning-input label="Enter Account Name" type="search"  onchange={searchContact} value={searchKey}></lightning-input>
                        <br/>
                        <template if:true={contacts}>
                            <template for:each={contacts} for:item="contact">
                                <p key={contact.Id}>
                                    {contact.Name}
                                </p>
                            </template>
                        </template>
                        <template if:true={error}>
                            {error}>
                        </template>
              </lightning-layout-item>
            </lightning-layout>
          </lightning-card>
</template>
Step 4: Now, we need to work on the JS file.
showContactsWMFP.js
import { LightningElement, track, wire } from 'lwc';
import searchContactList from '@salesforce/apex/LWC_ContactController.searchContactList';

export default class ShowContactsWMFP extends LightningElement {
    @track searchKey = '';
    @track contacts;
    @track error;

    searchContact(event){
        this.searchKey = event.target.value;
    }

    @wire(searchContactList, {accountName:'$searchKey'})
    wiredContacts({data, error}){
        if(data){
            this.contacts = data;
            this.error = undefined;
        }
        else if (error) {
            this.error = error;
            this.contacts = undefined;
        }
    }
}
As per the wire method writing rules, first we have imported “searchContactList” from the Apex Class, “LWC_ContactController“. Then, the function named wiredContacts is wired to searchContactList with parameters in this way
@wire(searchContactList, {accountName:’$searchKey’})
wiredContacts({data, error}){ }
where “searchkey” is the user input defines the Account Name. During passing of the parameters, we need to put ‘$’ sign before the property.
We have defined two private reactive properties such as contacts and error. We have set these two properties into the wired function named wiredContacts. Hence, we will get the Contact record details using only {contacts} instead of {contact.data} applied for wire method to property mechanism in HTML file. And obviously, we will get the errors using {error} in HTML file.
We have used wire mechanism so, the cacheable of the respective method, searchContactList() of the Apex Class “LWC_ContactController” should be true.
Step 5: At last, need to add this LWC into Lightning App/Home or Record Page.
Result

102,594 total views, 27 views today