DOM Manipulation in Lightning Web Component

In this session, we will learn how to manipulate DOM Tree in Lightning Web Component.

What is DOM?

  • The acronym of DOM is “Document Object Model”.
  • DOM is a programming API for HTML & XML.
  • DOM is a logical structure(tree) of the document.

When DOM is created?
At the time of loading HTML/XML, DOM is created.

Please see my video on youtube on regarding this DOM Manipulation in Lightning Web Component


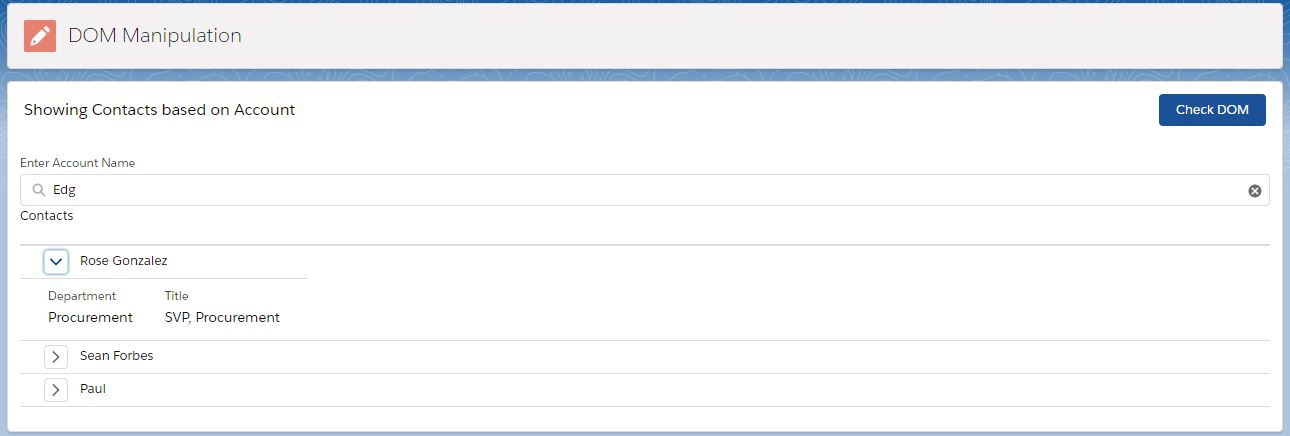
To understand DOM Manipulation, we have created one Lightning Web Component (LWC) named “showContactsPanel” by which we can show the Contact records based on an account.

Please download this LWC from the following URL:

https://github.com/SantanuatGithub/DOMManipulation.git

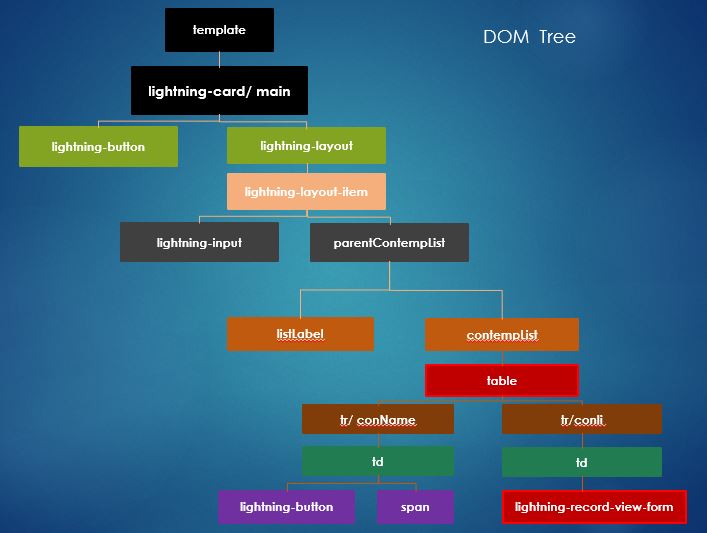
According to the showContactsPanel.html file, DOM Tree looks like


Generally, in HTML, we can access particular node with respect to Id, Class, Tag by using document.getElementById(“#Id”), document.getElementsByClassName(“.Class”), document.getElementsByTagName(“h1”) or by using this.document.querySelector().

To manipulate the DOM in LWC, we will use this.template.querySelector() where “template” is the root node in LWC.

Steps to execute

  • Deploy the downloaded “showContactsPanel” LWC with Apex Class.
  • Add this LWC into any Lightning Page and assign to any Lightning Application.
  • Need to focus on manipulateDOM() method in the JS file.
  • Uncomment the lines for the particular scenario just as mentioned in the Video. Please do not uncomment all the lines in this method.
  • Refresh the Page in Lightning Experience.
  • Click on “Check DOM” button to see the output. May be, browser console need to be opened to see the output for certain test cases.


//Read Header from lightning-card
console.log(‘Lightning Card Header–>’+this.template.querySelector(‘lightning-card’).title);
we can also use “main” class to get the title by using this.template.querySelector(‘.main’).title
//Change Title
this.template.querySelector(‘lightning-card’).title = “Learning DOM Manipulation in Lightning Web Component”;
//get text content
console.log(‘Content–>’+this.template.querySelector(‘.main’).textContent);
We can use textContent to get the value of a particular node.
//Change content color of the lightning-card
this.template.querySelector(‘lightning-card’).style.color=’green’;
//add same style from CSS file
this.template.querySelector(‘lightning-card’).classList.add(‘panelHeader’);
//get the contacts sequentially
let contactList = this.template.querySelectorAll(‘.conName’);
console.log(‘Contact 1–>’+contactList[0].textContent);
console.log(‘Contact 2–>’+contactList[1].textContent);
//get the length of the list
console.log(‘ConList–>’+contactList.length);
//change the color of last element
contactList[contactList.length-1].style.color=’red’;
//get first item
let firstItem = this.template.querySelector(‘.conName:first-child’);
console.log(‘firstChild–>’+firstItem.textContent);
//get last item
let lastItem = this.template.querySelector(‘.conName:last-child’);
console.log(‘lastChild–>’+lastItem.textContent);
//get nth Item
let nthConItem = this.template.querySelector(‘.conName:nth-child(2)’);
console.log(‘nthItem–>’+nthConItem.textContent);
//Stripped Table by DOM Execution
let contactOddList = this.template.querySelectorAll(‘.conName:nth-child(odd)’);
let contactEvenList = this.template.querySelectorAll(‘.conName:nth-child(even)’);
for(let i = 0; i < contactOddList.length; i++){
contactOddList[i].style.backgroundColor = ‘#D5DBDB’;
contactEvenList[i].style.backgroundColor = ‘#BDC3C7’;
}
//get the parent node
let contempList = this.template.querySelector(‘.contempList’);
console.log(‘parent node–>’+contempList.parentNode);
//get the parent node content
console.log(‘parent node–>’+contempList.parentNode.textcontent);
change the color of parent node
contempList.parentNode.style.color=”red”;
//get the child node
let parentContempList = this.template.querySelector(‘.parentContempList’);
console.log(‘child node–>’+parentContempList.children[0]);
//get the child node content
//console.log(‘child node–>’+parentContempList.children[0].textContent);
//change the color of child nodes
parentContempList.children[0].style.color=”green”;
parentContempList.children[1].style.color=”red”;
//set the child node contents
parentContempList.firstElementChild.textContent = “Displaying Data”;
parentContempList.lastElementChild.textContent = “Transferred Rows”;
//get attribute at certain level
letcontactList=this.template.querySelectorAll(‘.conName’);
for(let k=0; k<contactList.length; k++){
console.log(contactList[k].getAttribute(‘id’));
}
Q: Now, we want to see the Contact detail by clicking a button for every row. How can we achieve it?
If you open the “showContactsPanel” LWC, you can see entire second <tr> was commented in the table. Please uncomment this row and refresh the page. Now, you can see the specific Contact detail by clicking on each row.
We will analyze toggleRow() method in the JS file.
toggleRow(event){

        event.preventDefault();

        this.recId = event.target.dataset.id;
        
        //get the attribute of DOM element using wild characters
        //let currentElement = this.template.querySelector("[id^='" + this.recId + "']");
        //console.log('currentElement-->'+currentElement.textContent);

        
        this.recId = event.target.dataset.id;
        let conList = this.template.querySelectorAll('.conli');

        let btnList = this.template.querySelectorAll('.btn');

        for (let j = 0; j < btnList.length; j++){
            btnList[j].iconName = "utility:chevronright";
        }

        
        for (let i = 0; i < conList.length; i++){
            let indvRow = conList[i];
            let indvRowId = conList[i].getAttribute('id');  
            
            if(indvRowId.includes(this.recId)) {
                if(indvRow.classList.contains("slds-show")){
                    indvRow.classList.add("slds-hide");
                    indvRow.classList.remove("slds-show");
                    event.target.iconName = "utility:chevronright";
                }
                else{
                    indvRow.classList.remove("slds-hide");
                    indvRow.classList.add("slds-show");
                    event.target.iconName = "utility:chevrondown";
                }
            }
            else{
                indvRow.classList.add("slds-hide");
                indvRow.classList.remove("slds-show");
            }
        }
    }    
We have used data-id attribute in <lightning-button-icon> where data-id attribute contains the specific record id. If we want to get this record id on clicking, we have to use event.target.dataset just like event.target.dataset.id. After that, we need to compare the record id with the entire DOM to close the other rows’ panels and open the particular row panel for the specific Contact record just like
                                                                                    Thank you !!


20,261 total views, 2 views today

Rating: 4.9/5. From 11 votes.
Please wait...
This entry was posted in Lightning Web Component, Salesforce Lightning. Bookmark the permalink.

Leave a Reply