Pagination With Unlimited Records in Lightning

Pagination With Unlimited Records in Lightning


As you know, We can build the pagination by using Offset feature in SOQL, but this offset pagination has the limit to show the 2000 records, using StandardSetController, it can be reached to max 10000.

So, I have built this component to paginate the unlimited records. I hope it will help you to build pagination without any limit.

Features

  • This component will be capable of paginate the records for unlimited data. For example, here we have considered Account object.
  • Inline editing feature is enabled. So, you can edit and save the record.
  • Inline editing feature is applicable in bulk mode. So, you can edit multiple records in the table and save he records in the single-click.
  • It has the Search functionality and also it has the pagination feature in Search results.

Step 1: Create an Auto number field in the object from where we will fetch the records. Here, we have created an auto number field named “AccountReference” on Account object with displaying format ACR-{0000000000}

Step 2: Create an Apex Class named “UnlimitedPaginationController.cls”

Basically, the following three methods from the apex class are responsible to operate the pagination in LWC.

getAccounts() method is responsible to return Account records by starting Auto Number and ending Auto Number for each page.

searchAccounts() method is responsible to search accounts by search key coming from LWC.

saveAccounts() method is responsible to save the account records in bulk mode by JSON deserializing the information sent from LWC.

Step 3: Create a LWC bundle named “unlimitedPagination“.
First, we will update “unlimitedPagination.js-meta.xml”

Next, we will update “unlimitedPagaination.html” in this way.

Next, we will update “unlimitedPagaination.js” in this way.

Output

36,433 total views, 9 views today

Include SLDS into LWC Open Source Application

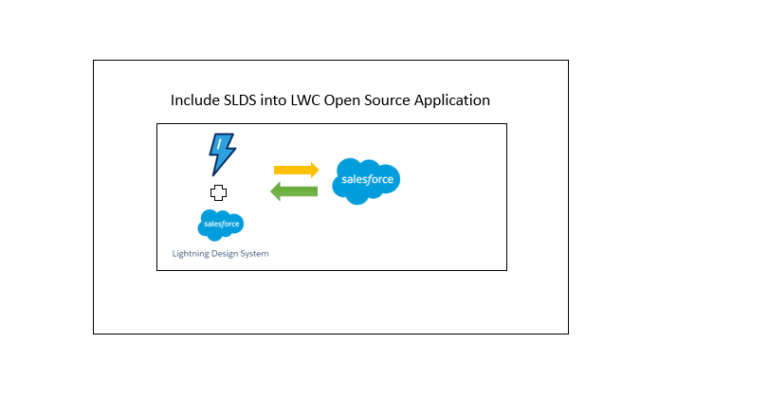
In this tutorial, we will see how to include Salesforce Lightning Design System(SLDS) component into the LWC Open Source Application. But, before this, please complete this previous tutorial.

As per the previous tutorial, we already have created a customer-service-app using LWC Open Source framework where we are showing all Case Records from Salesforce. But, We have not applied SLDS into this application. Now, we will see how to include SLDS into this LWC Open Source application. Let’s start.

Step 1: Open customer-service-app in VS Code.

Step 2: Please install @salesforce-ux/design-system node modules to load all the SLDS Styles into your project by executing the following command from the terminal of the VS Code.

npm install @salesforce-ux/design-system

After the execution of this, we can see the dependencies in package.json file.

Step 3: Before applying SLDS into our application, first we have to understand the difference between native shadow DOM and synthetic shadow DOM for LWC.

Native Shadow DOM: Native Shadow DOM is by default enabled in LWC Open Source. Basically, we are calling app component from index.html in this project. So, If we will include the SLDS styles using tag in the header of our index.html file, the immediate app.html can get all the SLDS Styles, but this is the wrong statement. app.html can not inherit the styles applied for the parent html i.e., index.html file. Because, Native Shadow DOM encapsulates all our components in the application that means every component can define its own style.

Synthetic Shadow DOM: This is the exception of Native Shadow DOM means it will not encapsulate all the components. So, app.html can inherit the styles applied for the parent html i.e., index.html file.

First, we will apply Synthetic Shadow DOM. Then, we will learn about Native Shadow DOM.

Step 4: Need to install @lwc/synthetic-shadow node module from the terminal of the VS Code to enable synthetic shadow DOM.

 npm install @lwc/synthetic-shadow 

Step 5: Open lwc-services.config.js file and include the exact directory for salesforce-lightning-design-system.css file in this way.

// Find the full example of all available configuration options at
// https://github.com/muenzpraeger/create-lwc-app/blob/master/packages/lwc-services/example/lwc-services.config.js
module.exports = {
    resources: [{ from: 'src/client/resources', to: 'dist/resources/' },
    {
        from: 'node_modules/@salesforce-ux/design-system/assets',
        to: 'src/SLDS'
    },
    {
        from: 'node_modules/@salesforce-ux/design-system/assets',
        to: 'dist/SLDS'
    }
],
    sourceDir: './src/client',
    moduleDir: './src/client/modules',
    devServer: {
        proxy: { '/': 'http://localhost:3002' }
    }
};

Here, you can see that program will create new src/SLDS directory where all SLDS style files will be there.

Step 6: Open src\client\ index.js file and import @lwc/synthetic-shadow into this file just like:

import '@lwc/synthetic-shadow';
import { createElement } from 'lwc';
import MyApp from 'my/app';

const app = createElement('my-app', { is: MyApp });
// eslint-disable-next-line @lwc/lwc/no-document-query
document.querySelector('#main').appendChild(app);

Step 7: Open src\client\index.html file and include the salesforce-lightning-design-system.css file using link tag in the header of the html file.

<!DOCTYPE html>
<html lang="en">
    <head>
        <meta charset="utf-8" />
        <title>Customer Service Application</title>
        <style>
            body {
                font-family: Arial, Helvetica, sans-serif;
            }
        </style>
        <meta name="viewport" content="width=device-width,initial-scale=1" />
        <link rel="shortcut icon" href="/resources/favicon.ico" />
        <link rel="stylesheet" type="text/css" href="/SLDS/styles/salesforce-lightning-design-system.css" />
    </head>
    <body>        
        <div id="main">

        </div>       
    </body>
</html>

Step 8: Now, we need to include SLDS styles into our html table of the src\client\modules\my\app\app.html file.

<template>
    <header>
        <img src="resources/lwc.png" alt="App logo">
        <h2>Customer Service Application</h2>
    </header>

    <!-- Page code -->
    <main class="content">
        
            <!--<input type="search" placeholder="Search contacts..."
                    oninput={searchdata} />-->

            <table class="slds-table slds-table_cell-buffer slds-table_bordered">
                <thead>
                    <tr class="slds-line-height_reset">
                        <th scope="col">
                            <div class="slds-truncate">
                                <input type="checkbox"></input>
                            </div>
                        </th>
                        <th scope="col">
                            <div class="slds-truncate" title="Name">Case Number</div>
                        </th>
                        <th scope="col">
                            <div class="slds-truncate" title="Subject">Subject</div>
                        </th>
                        <th scope="col">
                            <div class="slds-truncate" title="Status">Status</div>
                        </th>
                        <th scope="col">
                            <div class="slds-truncate" title="Priority">Priority</div>
                        </th>
                        <th scope="col">
                            <div class="slds-truncate" title="Created Date">Created Date</div>
                        </th>
                        <th scope="col">
                            <div class="slds-truncate" title="Closed Date">Closed Date</div>
                        </th>
                    </tr>
                </thead>
                <tbody>
                    <template for:each={cases} for:item="cs">
                        
                            <tr key={cs.id}>
                                    <th scope="col">
                                        <div>
                                            <input type="checkbox" value={cs.CaseNumber} data-id={cs.id}></input>
                                        </div>
                                    </th>
                                    <th scope="col">
                                        <div>{cs.CaseNumber}</div>
                                    </th>
                                    <th scope="col">
                                        <div>{cs.Subject}</div>
                                    </th>
                                    <th scope="col">
                                        <div>{cs.Status}</div>
                                    </th>
                                    <th scope="col">
                                        <div>{cs.Priority}</div>
                                    </th>
                                    <th scope="col">
                                        <div>{cs.CreatedDate}</div>
                                    </th>
                                    <th scope="col">
                                        <div>{cs.ClosedDate}</div>
                                    </th>
                                </tr>


                    </template>
                </tbody>
            </table>

       
    </main>
</template>

Step 9: So, now app.html can use the SLDS component from the salesforce-lightning-design-system.css file declared in index.html file. This is possible by applying Synthetic Shadow DOM.

Step 10: Run the command from the terminal of the VS Code as

 npm run watch 

and we will get the output at http://localhost:3001 as the Case records are visible in the table using SLDS styles as per the following image:


Good Job! Now, you have successfully included SLDS Styles into the customer-service-app built by LWC Open Source framework.

But, we have done this by Synthetic Shadow DOM which is not enabled by default in LWC Open Source. Let’s try the same thing with Native Shadow DOM into the next tutorial.


27,368 total views, 6 views today

Connect Salesforce from LWC Open Source Application

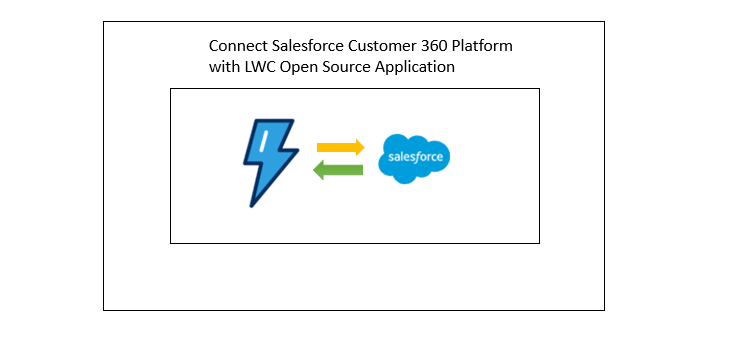
Please complete the previous tutorial about building a simple application by LWC Open Source.

Our object is that customer-service-app will show the Case records from Salesforce. Already, we have created customer-service-app as per the previous tutorial. Now, we have to connect to Salesforce to get the Case records and we have to upgrade the UI layer for our customer-service-app.

Step 1: Please open the customer-service-app in VS Code and you will get this type of project structure.


Step 2: Before updating any file, let’s discuss the importance of some existing files.

  • api.js: We can see the api.js in this path src/server. This js file helps to execute this customer service application in the localhost or event in a specific port.
  • lwc-services.config.js: We can see this file in the root directory of this project. This file defines the path for the resources, sourceDir, moduleDir. So, system will understand the executable files.
  • index.html:  We can see the index.html page in this path src/client. This html is the starter page of the application. From this html file we will call our lwc template by index.js.
  • index.js: We can see the index.js in this path src/client.  This js file helps to call our lwc template named “app” during running of the application.
  • app folder: We can get this folder in this path src/client/modules/my. This folder contains app.html and app .js file where we will write our business logic.
  • greeting folder: We can also get this folder in this path src/client/modules/my. This is invoked from app.html file. This folder contains greeting.html and greeting.js file to show the greeting message by default.
  • package.json: At last, we can see the information related to installed node modules in dependencies and devDependencies tag and how can we run the application using npm run watch.

Take time. No hurry. I would like to request you please see the above-mentioned files carefully before we will change the code to fulfill the business objective of our customer-service-app.

Step 3: First we will create a folder named “data” under this path src/client/modules. In this data folder, please create another folder called “caseServices“.  In this “caseServices” folder, please create a caseServices.js file. So, now, the module looks like:


Step 4: Please update the following code snippet for the customerServices.js file.

const URL = '/api/cases';
let cases = [];
export const getCases = () => fetch(URL)
  .then(response => {
    if (!response.ok) {
      throw new Error('No response from server');
    }
    return response.json();
  })
  .then(result => {
    cases = result.data;
    return cases;
  });

Step 5: Please execute this command from the terminal of the VS Code.

npm install jsforce dotenv

This will help to install the jsforce node modules to build communication with Salesforce and dotenv node modules to work with environment files. After successful execution, you can see the dependencies of package.json file looks like:


Step 6: Please create a new file named “.env” in the root directory of the project just like

SF_LOGIN_URL=LOGIN_URL
SF_USERNAME=YOUR_USERNAME
SF_PASSWORD=YOUR_PASSWORD  
SF_TOKEN=YOUR_SECURITY_TOKEN

This “.env” files contains credential information to log into Salesforce Instance. So, please fill up the correct information.

Step 7: Now, we will update the api.js file under the path src/server. So, please update the api.js file in this following code snippet.

// Simple Express server setup to serve for local testing/dev API server
const compression = require('compression');
const helmet = require('helmet');
const express = require('express');

const jsforce = require('jsforce');
require('dotenv').config();
const { SF_USERNAME, SF_PASSWORD, SF_TOKEN, SF_LOGIN_URL } = process.env;
if (!(SF_USERNAME && SF_PASSWORD && SF_TOKEN && SF_LOGIN_URL)) {
    console.error(
        'Cannot start app: missing mandatory configuration. Check your .env file.'
    );
    process.exit(-1);
}
const conn = new jsforce.Connection({
    loginUrl: SF_LOGIN_URL
});
conn.login(SF_USERNAME, SF_PASSWORD + SF_TOKEN, err => {
    if (err) {
        console.error(err);
        process.exit(-1);
    }
});


const app = express();
app.use(helmet());
app.use(compression());

const HOST = process.env.API_HOST || 'localhost';
const PORT = process.env.API_PORT || 3002;

app.get('/api/cases', (req, res) => {
    const soql = `SELECT Id, CaseNumber, Subject, Status, Priority, format(CreatedDate) formattedCreatedDate, format(ClosedDate) formattedClosedDate FROM Case`;
    
    conn.query(soql, (err, result) => {
        if (err) {
            res.sendStatus(500);
        } else if (result.records.length === 0) {
            res.status(404).send('Session not found.');
        } else {
            const formattedData = result.records.map(caseRecord => {
                let cases = [];
                return {
                    id: caseRecord.Id,
                    CaseNumber: caseRecord.CaseNumber,
                    Subject: caseRecord.Subject,
                    Status: caseRecord.Status,
                    Priority: caseRecord.Priority,
                    CreatedDate: caseRecord.formattedCreatedDate,
                    ClosedDate: caseRecord.formattedClosedDate,
                    cases
                };
            });
            res.send({ data: formattedData });
        }
    });
});

app.listen(PORT, () =>
    console.log(
        `✅  API Server started: http://${HOST}:${PORT}/api/v1/endpoint`
    )
);

Step 8: Now, we will update the app.html,app.js and app.css files under this path src/client/modules/my/app.
So, update the app.js file first:

app.js

import { LightningElement, track } from 'lwc';
import { getCases } from 'data/caseServices';

export default class App extends LightningElement {
    @track cases = [];

   connectedCallback() {
        getCases().then(result => {
        this.cases = result;
        });
    }

}

app.html

<template>
    <header>
        <img src="resources/lwc.png" alt="App logo">
        <h2>Customer Service Application</h2>
    </header>
    <!-- Page code -->
    <main class="content">      
            <table>
                <thead>
                    <tr>
                        <th scope="col">
                            <div>
                                <input type="checkbox"></input>
                            </div>
                        </th>
                        <th scope="col">
                            <div title="Name">Case Number</div>
                        </th>
                        <th scope="col">
                            <div title="Subject">Subject</div>
                        </th>
                        <th scope="col">
                            <div title="Status">Status</div>
                        </th>
                        <th scope="col">
                            <div title="Priority">Priority</div>
                        </th>
                        <th scope="col">
                            <div title="Created Date">Created Date</div>
                        </th>
                        <th scope="col">
                            <div title="Closed Date">Closed Date</div>
                        </th>
                    </tr>
                </thead>
                <tbody>
                    <template for:each={cases} for:item="cs">                        
                            <tr key={cs.id}>
                                    <th scope="col">
                                        <div>
                                            <input type="checkbox" value={cs.CaseNumber} data-id={cs.id}></input>
                                        </div>
                                    </th>
                                    <th scope="col">
                                        <div>{cs.CaseNumber}</div>
                                    </th>
                                    <th scope="col">
                                        <div>{cs.Subject}</div>
                                    </th>
                                    <th scope="col">
                                        <div>{cs.Status}</div>
                                    </th>
                                    <th scope="col">
                                        <div>{cs.Priority}</div>
                                    </th>
                                    <th scope="col">
                                        <div>{cs.CreatedDate}</div>
                                    </th>
                                    <th scope="col">
                                        <div>{cs.ClosedDate}</div>
                                    </th>
                                </tr>
                    </template>
                </tbody>
            </table>       
    </main>
</template>

app.css

.content {
    padding-top: 2rem;
    padding-left: 2rem;
    padding-right: 2rem;
    padding-bottom: 2rem;
}
header {
    padding: 1rem;
    display: flex;
    color: #ffffff;
    background: #0288d1;
    box-shadow: 0 4px 3px rgba(1, 87, 155, 0.5);
    align-items: center;
}
header img {
    height: 3rem;
    margin-right: 0.3rem;
}
header h2 {
    font-size: 1.75rem;
    font-weight: 300;
}

Step 9: Now, we will delete the unused folder or files. We can delete greeting folder as there is no dependency on this folder for our customer-service-app. We can delete “__tests__” folder as we will not work on this at this moment. So, the entire src structure looks like:


Step 10: Now, run the command

npm run watch 

from the terminal of VS Code and you will get the output at http://localhost:3001


Fantastic! you have successfully communicated with Salesforce for this LWC Open Source app.

In this example, we can see all the Case records into our own customer-service-app, but the UI doesn’t look good. Something is missing. Yes, you are right. Still, we have not applied Salesforce Lightning Design Styles. Let’s focus this into the next tutorial.

13,214 total views, 3 views today

Build a simple application by LWC Open Source

In the previous articles, we have seen how to create simple node application with express server. Now, we will see how to create a simple application using Lightning Web Component(LWC) Open Source.

In this tutorial, we will try to host an application for Customer Service Programme. So, please maintain the following steps:

Step 1: Still, if you have not installed Node.js please install it first.  After that please set the environment variable for Node JS framework.

Step 2: Please open a command line or terminal and point to any drive.

Step 3: Just write down this line

 npx create-lwc-app customer-service-app 

Here, customer-service-app is our application name.

Step 4: During the execution of this command, please enter the necessary information as per the following image:


It will take a few minutes to create a customer-service-app using LWC Open Source.  And, you will get this confirmation.

Step 5: Now, open this application customer-service-app from Visual Studio Code.

Step 6: Please execute the following command from the terminal of your VS Code or command line to see the result:

npm run watch


Step 7: Now, if we will run this URL: http://localhost:3001, we will get the result:


Amazing! Now, we are able to create and execute a simple application using Lightning Web Component Open Source.

Special Thanks to Salesforce to help us to create an application using Lightning Web Component Open Source in a very short time.

14,635 total views, 9 views today

How to use SLDS in Node JS?

In this tutorial, we will see how can we include Salesforce Lightning Design System (SLDS) component into a node application. But, before this please read this blog (Build Simple Application by Node JS) first.

In the previous blog (Build Simple Application by Node JS), we have seen how will we execute a simple node application by express server framework. Now, we will include SLDS component into the same application. So, please maintain all the following steps:

Step 1: Open VS Code and open the same folder named “simple-node-app“.

Step 2: Open the terminal from your VS Code by using Shortcut Key (ctrl + `) (for windows).

Step 3: Now, we will install SLDS Library into the node_modules folder by executing the following command from the terminal of VS Code.

 npm install @salesforce-ux/design-system 

Step 4: After installation, you can see that dependency files are upgraded with @salesforce-ux/design-system in package.json file as per the following image.


We can get all the SLDS details from this url: https://lightningdesignsystem.com

Step 5:(optional): Please create a .gitignore file in the project’s root directory. This file will direct
the respective files/modules to be ignored during git push process. Here, we don’t want to push the “node_modules” folder in GIT repository. So, we will update the .gitignore file in this way:

# Tooling files
node_modules

Step 6: Create an index.html file in the project’s root directory with the following code snippet:

<html lang="en">
    <head>
        <title>HTML with SLDS by Node</title>
    </head>
    <body style="background-color:rgb(243, 242, 243)">    
       <div class="slds-card">          
          <div class="slds-p-around_medium">Hello World!</div>
       </div>
    </body>
</html>    

We will just show the “Hello World!” message.

Step 7: Now, the structure of our project looks like:


Step 8: Now, open the index.js file and update the code snippet with the following lines:

const express = require('express');
const app = express();
const path = require('path');
 
var PORT = process.env.port || 3001;

const SLDS_DIR = '/node_modules/@salesforce-ux/design-system/assets';

app.use('/slds', express.static(__dirname + SLDS_DIR));
 
app.get('/', function (req, res) {
  //res.send('Hello World!');
  res.sendFile(path.resolve('index.html'));
});

app.listen(PORT, function () {
  console.log(`App listening on port ${PORT}`);
});

Here, you can see we have changed multiple lines. Let’s discuss one by one:

  • We have declared a constant variable named “SLDS_DIR” where we have given the pathname in which salesforce-lightning-design-system styles folder exists.
  • Next, we are passing this variable in express.static() method with “__dirname” to declare the “/slds” path at line no. 9. So, for the next time, in the html file, if we need to call the salesforce-lightning-design-system.css we only need to use “/slds/styles/salesforce-lightning-design-system.css“.
  • In the next step, we will call our index.html file by using the following syntax: res.sendFile(path.resolve(‘index.html’));

Step 9: Now, run the application by executing this command

 node index.js 

from the terminal of the VS Code. The application will be hosted on localhost:3001.

So, we will get the output in this url: http://localhost:3001 as per the following image

Oh no! But, we are not getting the styles from SLDS. Something is missing.
Don’t worry! Let’s execute the next Step.

Step 10: Please link the salesforce-lightning-design-system.css file in the header of the html file just like:

<html lang="en">
    <head>
        <title>HTML with SLDS by Node</title>
        <link rel="stylesheet" type="text/css" href="/slds/styles/salesforce-lightning-design-system.css" />
    </head>
    <body style="background-color:rgb(243, 242, 243)">    
       <div class="slds-card">          
          <div class="slds-p-around_medium">Hello World!</div>
       </div>
    </body>
</html>

Now, refresh your browser or executing this url: http://localhost:3001 again to see the correct output as per the following image

WOW! Now, we can see the “Hello World” message with SLDS design in SLDS card. Enjoy!!

14,277 total views, 6 views today

Build simple application by Node JS

In this session, we will learn how to develop a simple Node.JS application with express.js web application framework.

I thought before starting about Lightning Web Component Open Source, we need to learn about Node JS and other certain useful libraries. Let’s start:

Node JS was written by Sir Ryan Dahl in 2009 [wiki]. Node JS is not a programming language. It’s an open-source, cross-platform javascript run time environment that executes javascript code outside a web browser. Node JS supports event-driven architecture and also supports asynchronous I/O framework. Developers also can build server-side scripting by this Node JS. It’s built on the basis of Google’s V8 JavaScript engine.

Now, we will create a simple “Hello World” app which will be executed by server-side scripting.

So, please follow the mentioned steps.

Step 1: Install Node.js. If you have not installed earlier, please install node.js from this link.

Step 2: Please set the environment variable for Node JS.

Step 3: Please check the version for node and npm from command prompt with the following syntax.
npm(Node Package Manager) which manages all the packages/extensions developed by node.js to install in your local repository.


Step 4: Create a new folder. Let’s say, I have created a new folder named “simple-node-app”.

Step 5: Now, we will create a project for the node using this initializing command from the command prompt of the same project directory.

npm init

It will ask you to provide the following information as per the following image. For now, just you can press enter to set the default for all the line items. After executing this command, it will create a package.json file and it will install all node js dependency frameworks/libraries into the node_modules folder.


Step 6: Now, open this folder “simple-node-app” from your VS Code.

Step 7: Now, we will install express js web application framework to execute server-side scripting and provide a response to the Client. Please execute the following command to install express js from the command prompt or from the terminal of the VS Code for this folder/project root directory.

npm install express

It will install express js framework in your node_modules folder of the project directory.

Step 8: Great, you have completed all the installation process. Now, it’s time to write the code.
So, please create a js file named “index.js” in the same project directory. After creation of this file, your project directory looks like:


Step 9: Now, please write the following code snippets for index.js file.

var express = require('express');
var app = express();

var PORT = process.env.port || 3001;

app.get('/', function (req, res) {
  res.send('Hello World!');
});
app.listen(PORT, function () {
  console.log(`App listening on port ${PORT}`);
});

As per the code snippets, we have imported the express js library and define the port. process.env.port is required to run the application on any platform just like Heroku instead of only localhost.

After that, we have defined the application get feature to declare the “Hello world!” message to the client side/web browser. At last, we have set the application listening on the particular port using app.listen() method.

Step 10: Now, it’s time to execute. So, please run this following command node index.js from the command prompt or from the terminal of the VS Code. After some time, your first node application will be run on the localhost: http://locahost:3001


Output: When we will execute this URL: http://localhost:3001 from the browser, we will get “Hello World!” message in the browser,


                                                 Thanks for your time!!

10,283 total views, 18 views today