Lightning Data Service – Lightning Record View Form

lightning-record-view-form component will display the record details by using record-id and lightning-output-field. This component is also based on LDS(Lightning Data Service).

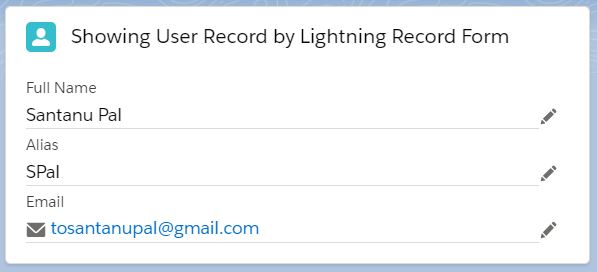
We will show the user record by lightning-record-view-from component.

So, we have built a LWC named “showLRVFRecord“.

Step 1: As per previous examples, we need to update the “showLRVFRecord.js-meta.xml” file to set the visibility in Lightning App Builder.

showLRVFRecord.js-meta.xml

<?xml version="1.0" encoding="UTF-8"?>
<LightningComponentBundle xmlns="http://soap.sforce.com/2006/04/metadata" fqn="showLRVFRecord">
    <apiVersion>45.0</apiVersion>
    <isExposed>true</isExposed>
    <targets>
        <target>lightning__AppPage</target>
        <target>lightning__RecordPage</target>
        <target>lightning__HomePage</target>
    </targets>
</LightningComponentBundle>

Step 2: Need to write the respective HTML file.

showLRVFRecord.html

<template>
        <lightning-card title="Showing User Record by Lightning Record Form"  icon-name="standard:user">
            <div class="slds-m-around_medium">
                <lightning-record-view-form object-api-name="User"
                                            record-id={userId}>
                    <div class="slds-box">
                        <lightning-output-field field-name="Name">
                        </lightning-output-field>
                        <lightning-output-field field-name="Alias">
                        </lightning-output-field>
                        <lightning-output-field field-name="Email">
                        </lightning-output-field>
                    </div>                                
                </lightning-record-view-form>                                                  
            </div>
        </lightning-card>
</template>

Here, we have defined lightning-record-view-form using the help of lightning-output-field to present the fields in output read only mode.

Step 3: Now, we need to work on the JS file.

showLRVFRecord.js

import { LightningElement } from 'lwc';
import CURRENTUSERID from '@salesforce/user/Id';

export default class ShowLRVFRecord extends LightningElement {
    userId = CURRENTUSERID;
}

We have passed logged in User Id to userId property.

Step 4: At last, need to add this LWC into Lightning App/Home or Record Page. Or, you can call this component from another component.

Result


Important Facts

This component will also not support all standard objects like Event, Task.
We can easily use lightning-record-from using “readonly” mode instead of using this component to show the output in read only version.

12,828 total views, no views today

Posted in Lightning Web Component | Leave a comment

Lightning Data Service – Lightning Record Form

We can show the Salesforce Record using lightning-record-from Salesforce base component which is based on LDS(Lightning Data Service). Even, System will allow to edit the record in standard way using this component.

We will show the user record by lightning-record-from component.

So, we have built a LWC named “showLRFRecord“.

Step 1: As per previous examples, we need to update the “showLRFRecord.js-meta.xml” file to set the visibility in Lightning App Builder.

showLRFRecord.js-meta.xml

<?xml version="1.0" encoding="UTF-8"?>
<LightningComponentBundle xmlns="http://soap.sforce.com/2006/04/metadata" fqn="showLRFRecord">
    <apiVersion>45.0</apiVersion>
    <isExposed>true</isExposed>
    <targets>
        <target>lightning__AppPage</target>
        <target>lightning__RecordPage</target>
        <target>lightning__HomePage</target>
    </targets>
</LightningComponentBundle>

Step 2: Need to write the respective HTML file.

showLRFRecord.html

<template>
        <lightning-card title="Showing User Record by Lightning Record Form"  icon-name="standard:user">
            <div class="slds-m-around_medium">
                <lightning-record-form object-api-name="User"
                                       record-id={userId}
                                       fields={fields}>
                </lightning-record-form>                                                  
            </div>
        </lightning-card>
</template>

Here, we have used lightning-record-from with object-api-name and fields attributes initially.

Step 3: Now, we need to work on the JS file.

showLRFRecord.js

import { LightningElement } from 'lwc';
import CURRENTUSERID from '@salesforce/user/Id';
import USER_NAME_FIELD from '@salesforce/schema/User.Name';
import USER_ALIAS_FIELD from '@salesforce/schema/User.Alias';
import USER_EMAIL_FIELD from '@salesforce/schema/User.Email';

export default class ShowLRFRecord extends LightningElement {

    userId = CURRENTUSERID;
    fields = [USER_NAME_FIELD, USER_ALIAS_FIELD, USER_EMAIL_FIELD];

}

We have built the array of fields using Salesforce Schema and set the fields property.

Step 4: At last, need to add this LWC into Lightning App/Home or Record Page. Or, you can call this component from another component.

Result


Important attributes for lightning-record-from

object-api-name: [Required] : need to provide sObject name. Remember, this component does not support all standard Objects such as Event, Task.
record-id: need to provide the record id for which you want to open the form.
mode: It may be “edit“, “view“, “readonly“.
Q. what is the difference between view and readonly mode?

You will get editable option if you will use “view” mode. It’s the default option. But, you will not get editable option if you will use “readonly” mode.

fields: need to provide the array of fields.
layout-type: It may be “Full” or “Compact“. It’s not recommended to use both fields and layout-type. Because, if you will use layout-type System will bring the fields from the layout definition automatically.
columns: define how many columns would be present in the UI.
record-type-id: It displays form based on record type.

Also, we can call a function on “onsuccess” event where we can provide the toast message after saving the record.
lightning-record-from does not support Client-Side Validations.

You can not customize the Save function using this component.

8,394 total views, no views today

Posted in Lightning Web Component | Leave a comment

How can you get the inputs directly without using the onchange event?

Till now, we have seen when we want to capture the value of input fields, we have used “onchange” event into the input fields just like

<lightning-input label="Department" onchange={handleChange} class="slds-m-bottom_x-small"></lightning-input>

In this “onchange” event procedure, always we are sending the values from input fields to JS file.

Is there any way to get the values of the input fields in a single shot?

The answer is YES. We can use querySelector() JS function to get a value in a single shot.

Let’s say, we have built a component named “takeUserInput“.

Step 1: As per previous examples, we need to update the “takeUserInput.js-meta.xml” file to set the visibility in Lightning App Builder.

takeUserInput.js-meta.xml

<?xml version="1.0" encoding="UTF-8"?>
<LightningComponentBundle xmlns="http://soap.sforce.com/2006/04/metadata" fqn="takeUserInput">
    <apiVersion>45.0</apiVersion>
    <isExposed>true</isExposed>
    <targets>
        <target>lightning__AppPage</target>
        <target>lightning__RecordPage</target>
        <target>lightning__HomePage</target>
    </targets>
</LightningComponentBundle>

Step 2: Need to write the respective HTML file.

takeUserInput.html

<template>
    <lightning-card title="Take User Inputs in a Single Shot" icon-name="standard:contact">
        <div class="slds-p-around_small">
            <lightning-input label="First Name" data-field="FirstName" class="slds-m-bottom_x-small"></lightning-input>
            <lightning-input label="Last Name" data-field="LastName" class="slds-m-bottom_x-small" required></lightning-input>
            <lightning-button label="Get Values" variant="brand" onclick={takeInputs}></lightning-button>
        
            <div class="slds-p-top_small">
                Name: {name}
            </div>
        </div>
    </lightning-card>    
</template>

Here, we have defined an attribute as data-field for all the input fields. Through this attribute,data-field, we will capture the input fields directly.

Step 3: Now, we need to work on the JS file.

takeUserInput.js

import { LightningElement,track } from 'lwc';

export default class TakeUserInput extends LightningElement {

    firstName;
    lastName;
    @track name;

    takeInputs(){
        this.firstName = this.template.querySelector("[data-field='FirstName']").value;
        this.lastName = this.template.querySelector("[data-field='LastName']").value;

        this.name = this.firstName + " " + this.lastName;
    }

}

We have used template.querySelector() JS function in which we have passed the data-field to denote the particular input field and get the value using “this.template.querySelector(“[data-field=’FirstName’]”).value” notation in a single shot.

Step 4: At last, need to add this LWC into Lightning App/Home or Record Page.

Result

19,757 total views, 3 views today

Posted in Lightning Web Component | Leave a comment

Lightning Web Component with Salesforce Data

Now the big question is how Lightning Web Component will communicate with Salesforce Data or Lightning Platform Database.
There are many more strategies to get the data from Salesforce via Lightning Web Component. Please read the following strategies to communicate between Lightning Web Component and Lightning Platform Database.

  • Lightning Data Service (LDS)
  • User Interface API(UI API)
  • Import methods from Apex Class


Lightning Data Service(LDS) – It is used to get the data and metadata from Salesforce without calling any Apex Class. It’s offline supported as well as it caches results on the client side. LDS optimizes server calls. It’s used to operate with a single record.

Basically, LDS is built on User Interface API(UI API). LDS supports all features provided by UI API such as CRUD access, Sharing Settings, Layout etc.

Following base components support LDS.

  • lightning-record-form
  • lightning-record-view-form
  • lightning-record-edit-form


User Interface API(UI API) – We can get data and metadata information in a single response by UI API without calling any Apex Class. It is a public and powerful Salesforce API to communicate between Client and Server side. UI API responses support CRUD access, Sharing Settings, Layout Information. We can operate multiple records using UI API. UI API provides powerful adapters such as uiRecordApi, uiListApi etc.

Example of using UI API (in LWC JS file)

import {getRecord, getFieldValue} from ‘lightning/uiRecordApi’;


Import methods from Apex Class – Lastly, we can directly import the method of an Apex Class in LWC JS file to communicate with the Salesforce Records. 
Example of using import methods from an Apex Class
import getContactList from ‘@salesforce/apex/LWC_ContactController.getContactList’;
Now, Salesforce provides the wire adapter and imperative way to communicate with the Salesforce records with the above-mentioned strategies.

9,507 total views, no views today

Posted in Lightning Web Component | Leave a comment

How to get Current User Id, Record Id and Object API Name in LWC?

In this section, we will see how we can get the Logged-In User Id, Current Record Id and Object API Name by Lightning Web Component.

Thanks to Salesforce again to provide such a beautiful mechanism to get the Logged-In User Id, Current Record Id and Object API Name in Lightning Web Component without using Apex Class. Let’s see.

We have created a Lightning Web Component named “getCurrentIds”.

Step 1: Definitely, we have to update the getCurrentIds.js-meta.xml file to set the visibility in Lightning App Builder.

getCurrentIds.js-meta.xml

<?xml version="1.0" encoding="UTF-8"?>
<LightningComponentBundle xmlns="http://soap.sforce.com/2006/04/metadata" fqn="getCurrentIds">
    <apiVersion>45.0</apiVersion>
    <isExposed>true</isExposed>
    <targets>
        <target>lightning__AppPage</target>
        <target>lightning__HomePage</target>
        <target>lightning__RecordPage</target>
    </targets>
</LightningComponentBundle>

Step 2: We have updated the html file.

getCurrentIds.html

<template>
    <lightning-card title="Get Current Ids" icon-name="utility:ribbon">
        <lightning-layout vertical-align="center" multiple-rows="true">
            <lightning-layout-item padding="around-small">
                Current User Id: {userId}              
            </lightning-layout-item>
            <lightning-layout-item padding="around-small">
                Current Record Id: {recordId}
            </lightning-layout-item>
            <lightning-layout-item padding="around-small">
                Current Object API Name: {objectApiName}
            </lightning-layout-item>
        </lightning-layout>        
    </lightning-card> 
</template>

In this html file, we are showing the Logged-In User Id, Current Record Id and Object API Name.

Step 3: We have updated the JS file.

getCurrentIds.js

import { LightningElement,api } from 'lwc';
import CURRENTUSERID from '@salesforce/user/Id';

export default class GetCurrentIds extends LightningElement {

    userId = CURRENTUSERID;

    @api recordId;
    @api objectApiName;

}

To get the current Record Id and Object API Name, we have to declare the respective properties with @api annotation just like @api recordId, @api objectApiName and we need to place the component into Lightning Record Page. These are the case sensitive. To get the current User Id, we have to import User Id from @salesforce/user/Id.

Step 4: Need to place the component into Lightning Record Page.

Result

43,815 total views, 3 views today

Posted in Lightning Components | Leave a comment

How to set Design Attributes in Lightning Web Component?

To set the design attributes in Lightning Web Component, we have to work on configuration file or component.js-meta.xml file.

We have created a Lightning Web Component named “configurator“.

Step 1: Need to update the configurator.js-meta.xml file to set the visibility in Lightning App Builder.

configurator.js-meta.xml

<?xml version="1.0" encoding="UTF-8"?>
<LightningComponentBundle xmlns="http://soap.sforce.com/2006/04/metadata" fqn="configurator">
    <apiVersion>45.0</apiVersion>
    <isExposed>true</isExposed>
    <targets>
        <target>lightning__AppPage</target>
        <target>lightning__HomePage</target>
        <target>lightning__RecordPage</target>        
    </targets>
</LightningComponentBundle>

Step 2: Need to write the html file.

configurator.html

<template>
    <lightning-card title="Design Attributes">    
        <lightning-layout>
            <lightning-layout-item flexibility="auto" padding="around-small">
                <lightning-input label="Description" value={description}></lightning-input>
                
Priority: <lightning-formatted-text value={priorityOptions}></lightning-formatted-text>
            </lightning-layout-item>
        </lightning-layout>
    </lightning-card>
</template>

Step 3: We have updated the JS file.

configurator.js

import { LightningElement, api } from 'lwc';

export default class Configurator extends LightningElement {
    @api priorityOptions;
    @api description;
   
}

Step 4: Again, we have updated configurator.js-meta.xml file to set the design attributes.

configurator.js-meta.xml

<?xml version="1.0" encoding="UTF-8"?>
<LightningComponentBundle xmlns="http://soap.sforce.com/2006/04/metadata" fqn="configurator">
    <apiVersion>45.0</apiVersion>
    <isExposed>true</isExposed>
    <targets>
        <target>lightning__AppPage</target>
        <target>lightning__HomePage</target>
        <target>lightning__RecordPage</target>        
    </targets>
    <targetConfigs>
        <targetConfig targets="lightning__AppPage, lightning__HomePage">
            <property label="Select Priority" name="priorityOptions" type="String" datasource="Low, Medium, High"></property>
            <property label="Description" name="description" type="String"></property>
        </targetConfig>
        <targetConfig targets="lightning__RecordPage">
            <property label="Description" name="description" type="String"></property>
            <property name="priorityOptions" type="String" datasource="Low, Medium, High"></property>
            <objects>              <object>Case</object>
              <object>Contact</object>
            </objects>
        </targetConfig>
    </targetConfigs>
</LightningComponentBundle>

Step 5: At last, we have added this component into Lightning App Page.


Result

15,471 total views, no views today

Posted in Lightning Web Component | Leave a comment

How to use assignment operator in conditional statement in LWC?

As per current release[Spring 19], you can not use assignment operator in conditional statement in html file of Lightning Web Component. That means, you can not put any condition in or the following syntax of html is invalid.

template if:true={count==4} Invalid

To understand this exercise, we have created one LWC named “conditionalStatement“.

Step 1: First of all, we have updated the conditionalStatement.js-meta.xml to set the visibility in Lightning App Builder.

conditionalStatement.js-meta.xml

<?xml version="1.0" encoding="UTF-8"?>
<LightningComponentBundle xmlns="http://soap.sforce.com/2006/04/metadata" fqn="conditionalStatement">
    <apiVersion>45.0</apiVersion>
    <isExposed>true</isExposed>
    <targets>
        <target>lightning__AppPage</target>
        <target>lightning__HomePage</target>
        <target>lightning__RecordPage</target>
    </targets>
</LightningComponentBundle>

Step 2: Need to update the HTML file.

conditionalStatement.html

<template>
    <lightning-card title="Conditional Statement" icon-name="utility:check">
        <lightning-layout>
            <lightning-layout-item padding="around-small">
                <lightning-button variant="brand" label="Click Me" onclick={handleClicks}></lightning-button>               
            </lightning-layout-item>
            <lightning-layout-item padding="around-small">
                <template if:true={hasRendered}>
                        WOW!! Appreciate your patience.
                </template>
            </lightning-layout-item>
        </lightning-layout>        
    </lightning-card> 
</template>

After 4th time click, this html file will display the message as “WOW!! Appreciate your patience.“. So, we can check this with conditional statement along with number of clicks in , but this is not possible due to limitation. That’s why, we have declared the property named “hasRendered” of boolean type. This property will return true when user clicked 4 times as per the assignment. Let’s see in the js file.

Step 3: Need to update the JS file.

conditionalStatement.js

import { LightningElement,track } from 'lwc';

export default class ConditionalStatement extends LightningElement {
    //@track hasRendered;
    @track count=0;

    handleClicks(){
        this.count++;
        /*if(this.count == 4)
            this.hasRendered = true;*/
    }

    get hasRendered(){
        // eslint-disable-next-line no-console
        console.log('count--->'+this.count);
        if(this.count === 4)
            return true;
        return false;
    }    

}

Here, we have declared handleClicks() method to count how many clicks are occurred by the user. Now, as discussed in last session, we have used get method of hasRendered property which will return true after 4th time click. Remember, for this we need to declare count as private reactive property.

Result

28,881 total views, 3 views today

Posted in Lightning Web Component | Leave a comment

Get & Set in Lightning Web Component

In this session, we will learn how to use get & set method in Lightning Web Component.

Generally, GET method returns value and SET method sets the value. We will follow the same way as in other OOPS Programming Language, JAVA.

To understand this exercise, we will see when user will give any input in the message box, the same i/p message will be visible in the output as read only.

We have created a Lightning Web Component named “getterSetter“.

Step 1: First, we have updated the getterSetter.js-meta.xml to set the visibility in Lightning App Builder.

getterSetter.js-meta.xml

<?xml version="1.0" encoding="UTF-8"?>
<LightningComponentBundle xmlns="http://soap.sforce.com/2006/04/metadata" fqn="getterSetter">
    <apiVersion>45.0</apiVersion>
    <isExposed>true</isExposed>
    <targets>
        <target>lightning__AppPage</target>
        <target>lightning__HomePage</target>
        <target>lightning__RecordPage</target>
    </targets>
</LightningComponentBundle>

Step 2: Need to update the html file.

getterSetter.html

<template>
    <lightning-card title = "Getter Setter Mechanism" icon-name="utility:bucket">          
        <lightning-layout>          
                <lightning-layout-item flexibility="auto" padding="around-small">               
                    
<div class="padding-around:small">
                        <lightning-input label="Message" value={message} onchange={handleMessage}></lightning-input>
                    </div>

                    
<div class="padding-around:small slds-m-top_small">
                        <lightning-formatted-text value={outputMessage} ></lightning-formatted-text>
                    </div>

                </lightning-layout-item>         
        </lightning-layout>
    </lightning-card>
</template>

Here, we have taken lightning-input base component to take the input from user and lightning-formatted-text base component to show the output. The respective attributes are message and outputMessage.

Step 3: Now, we have updated the JS file.

getterSetter.js

import { LightningElement, track } from 'lwc';

export default class GetterSetter extends LightningElement {

    defaultMsg = "We are learning ";
    @track outputMessage;

      
    get message(){
        return this.defaultMsg + "Lightning Web Component";
        
    }

    set message(val){
       this.outputMessage = val;
    }

    handleMessage(event){
        this.message = event.target.value;
    }

    
}

Here, we have declared one private attribute named defaultMsg which will store the default content. We have defined get and set for message property. So, System will return the message as “We are learning Lightning Web Component” and set the message to show in the output layer.Whenever user will write any thing, at this point of time handleMessage(event) function will be invoked, the value of message will be updated.

In the handleMessage(event) function, we have assigned the latest message value to this.message property. When we have assigned message property in this function, set method will be automatically invoked.

Step 4: At last, need to add this LWC into Lightning App Page.

Result

65,812 total views, no views today

Posted in Lightning Web Component | Leave a comment

Navigation Mechanism in Lightning Web Component

Navigation Mechanism is the way to redirect a new web page, new record, edit record, record detail page etc. without using Apex Class.

We have created one Lightning Web Component named “lightningNavigation“.

Step 1: Need to update the lightningNavigation.js-meta.xml file to set the visibility in Lightning App Builder.

lightningNavigation.js-meta.xml

<?xml version="1.0" encoding="UTF-8"?>
<LightningComponentBundle xmlns="http://soap.sforce.com/2006/04/metadata" fqn="lightningNavigation">
    <apiVersion>45.0</apiVersion>
    <isExposed>true</isExposed>
    <targets>
        <target>lightning__AppPage</target>
        <target>lightning__RecordPage</target>
        <target>lightning__HomePage</target>
    </targets>
</LightningComponentBundle>

Step 2: Need to write html file.

lightningNavigation.html

<template>
        <lightning-card title="Navigation System">    
                <lightning-layout multiplerows="true" verticalalign="center">                        
                        <lightning-layout-item padding="around-small" size="3">
                                <lightning-button variant="brand" label="Current Tab" title="Current Tab" onclick={navigateCurrentTab}>
                                </lightning-button>
                        </lightning-layout-item>
                        <lightning-layout-item padding="around-small" size="3">
                                <lightning-button variant="brand" label="Object Home" title="Object Home" onclick={navigateToObjectHome}>
                                </lightning-button>
                        </lightning-layout-item>
                        <lightning-layout-item padding="around-small" size="3">
                                <lightning-button variant="brand" label="List View" title="List View" onclick={navigateToListView}>
                                </lightning-button>
                        </lightning-layout-item>
                        <lightning-layout-item padding="around-small" size="3">
                                <lightning-button variant="brand" label="View Record" title="View Record" onclick={navigateToRecordView}>
                                </lightning-button>
                        </lightning-layout-item>
                </lightning-layout>
                <lightning-layout multiplerows="true" verticalalign="center">
                        <lightning-layout-item padding="around-small" size="3">
                                <lightning-button variant="success" label="New Record" title="New Record" onclick={navigateToNewRecord}>
                                </lightning-button> 
                        </lightning-layout-item>
                        <lightning-layout-item padding="around-small" size="3">            
                                <lightning-button variant="success" label="Edit Record" title="Edit Record" onclick={navigateToRecordEditPage}>
                                </lightning-button>
                        </lightning-layout-item>
                        <lightning-layout-item padding="around-small" size="3">
                                <lightning-button variant="success" label="Related List View" title="Related List View" onclick={navigateToRelatedList}>
                                </lightning-button>
                        </lightning-layout-item>
                        <lightning-layout-item padding="around-small" size="3">
                                <lightning-button variant="success" label="Web Page" title="Web Page" onclick={navigateToWebPage}>
                                </lightning-button>
                        </lightning-layout-item>                    
                </lightning-layout>
        </lightning-card>
</template>

Step 3: We have updated the JS file according to the navigation procedure.

lightningNavigation.js

import { LightningElement } from 'lwc';
import { NavigationMixin } from 'lightning/navigation';

export default class LightningNavigation extends NavigationMixin(LightningElement) {

    navigateCurrentTab(){
        this[NavigationMixin.Navigate]({
            type: 'standard__navItemPage',
            attributes: {
                apiName: "LWC",                
            }
        });
    }

    navigateToObjectHome(){
        this[NavigationMixin.Navigate]({
            type: 'standard__objectPage',
            attributes: {
                "objectApiName": "Contact",
                "actionName": "home"          
            }
        });
    }

    navigateToListView(){
        this[NavigationMixin.Navigate]({
            type: 'standard__objectPage',
            attributes: {
                "objectApiName": "Contact",
                "actionName": "list"          
            },
            state: {
                filterName: 'Recent'
            }
        });
    }

    navigateToNewRecord() {
        this[NavigationMixin.Navigate]({
            type: 'standard__objectPage',
            attributes: {
                objectApiName: 'Contact',
                actionName: 'new'
            }
        });
    }

    navigateToRecordView() {
        this[NavigationMixin.Navigate]({
            type: 'standard__recordPage',
            attributes: {
                recordId: "0030o00002dCDi7AAG",
                objectApiName: 'Contact', // objectApiName is optional
                actionName: 'view'
            }
        });
    }

    navigateToRecordEditPage() {
        // Opens the Account record modal
        // to view a particular record.
        this[NavigationMixin.Navigate]({
            type: 'standard__recordPage',
            attributes: {
                recordId: "0030o00002dCDi7AAG",
                objectApiName: 'Contact', // objectApiName is optional
                actionName: 'edit'
            }
        });
    }

    navigateToRelatedList() {
        this[NavigationMixin.Navigate]({
            type: 'standard__recordRelationshipPage',
            attributes: {
                recordId: '0010o00002Dw6eGAAR',
                objectApiName: 'Account',
                relationshipApiName: 'Contacts',
                actionName: 'view'
            }
        });
    }

    navigateToWebPage() {
        this[NavigationMixin.Navigate]({
            type: 'standard__webPage',
            attributes: {
                url: 'https://www.salesforce.com'
            }
        })        
    }
}

Step 4: Then, we have added the component into the Lightning App Page.

Result

Posted in Lightning Web Component | Leave a comment

Toast Notification in Lightning Web Component

In this section, we will see how to display toast notification and how to take user input through Lightning Web Component. The toast notification behavior is same as Lightning Aura Component. Following steps need to be maintained to fulfill the business.

We have created a Lightning Web Component named “displayToast.html

Step 1: First, we need to update the displayToast.js-meta.xml file to set the LWC visibility in App Builder.

displayToast.js-meta.xml

<?xml version="1.0" encoding="UTF-8"?>
<LightningComponentBundle xmlns="http://soap.sforce.com/2006/04/metadata" fqn="displayToast">
    <apiVersion>45.0</apiVersion>
    <isExposed>true</isExposed>
    <targets>
        <target>lightning__AppPage</target>
        <target>lightning__RecordPage</target>
        <target>lightning__HomePage</target>
    </targets>
</LightningComponentBundle>

Step 2: We have updated the html file in such a way user can select the toast variant such as Success, Warning & Error along with the input message.

displayToast.html

<template>
        <lightning-card title="Show Toast Message">    
            
<div class="inputClass">
                <lightning-layout >
                    <lightning-layout-item flexibility="auto" padding="around-small">
                        <lightning-input type="text" label="Message " value={msg} onchange={trackMessage}></lightning-input>
                        <lightning-combobox label="Variant" value={variant} onchange={updateVariant} options={variantOptions}></lightning-combobox>
                        
<div class="slds-float_right slds-m-top_medium">
                            <lightning-button variant="brand" label="Show Notification" onclick={showToast} ></lightning-button> &nbsp;&nbsp;
                            <lightning-button variant="brand" label="Reset" onclick={doReset}></lightning-button>
                        </div>

  
                    </lightning-layout-item>
                </lightning-layout>
            </div>

        </lightning-card>
</template>

Step 3: Need to update the JS file.

displayToast.js

import { LightningElement, track } from 'lwc';
import { ShowToastEvent } from 'lightning/platformShowToastEvent';

export default class DisplayToast extends LightningElement {
    @track msg;
    @track variant; /* understand the with/without @track &amp;amp; api*/
    title="Notification"
    variant = 'success';
    variantOptions = [
        {label : 'error', value : 'error'},
        {label : 'warning', value : 'warning'},
        {label : 'success', value : 'success'},
        {label : 'info', value : 'info'}
    ];

    updateVariant(event){
        this.variant = event.target.value;
    }

    trackMessage(event){
        this.msg = event.target.value;
    }

    showToast(){
        /*eslint-disable-next-line  no-console*/
        console.log('entry point');
        const evt = new ShowToastEvent({
            
            title: this.title,
            message: this.msg,
            variant: this.variant
        });
        this.dispatchEvent(evt);
    }

    doReset(){
        this.msg = '';
        this.variant = 'success';
    }
}

If you see the second line of this JS file, we have imported “platformShowToastEvent” to use the toast function in our Lightning web Component.

We have declared variantOptions to display the variants to the user. trackMessage() & updateVariant() functions have been used to get the input message & toast variant type from the end user.

In showToast() function, we have used standard ShowToastEvent() event along with the properties such as title, message, variant and dispatch the standard toast event. This showToast() function is invoked after clicked on “Show Toast Notification” button.

Reset has been used to restore the previous inputs.

Step 4: At last, need to add this LWC in Lightning App Page.

Result


Here, We have selected the variant as “success” and entered the message as “Showing Toast Example”, so after clicked on “Show Toast Notification” button, it’s displaying the toast message.

Notes
One more property called “mode” is present in ShowToastEvent(). There are three types of mode such as

  • dismissable: It’s automatically dismissed until you have not clicked in 3 seconds. It is the default property.
  • pester: It’s visible until user is clicked close button.
  • sticky: It’s visible for 3 seconds.

15,993 total views, no views today

Posted in Lightning Web Component | Leave a comment