One of the most important feature in HTML 5 is Custom Element. We can define our own tag with the help of Custom Element. To build the Custom Element, we need to create following components.
1. Define the DOMString name of the Custom Element in HTML file. Remember, Custom Element Name will be separated with hyphen(-). You can set the predefined attributes in your own custom element tag.
2. Define the Class Name which will extend the out of the box feature from HTMLElement.
3. Associate the Class Name with the Custom Element Name.
Let’s we have taken the previous example where we will define the custom element.
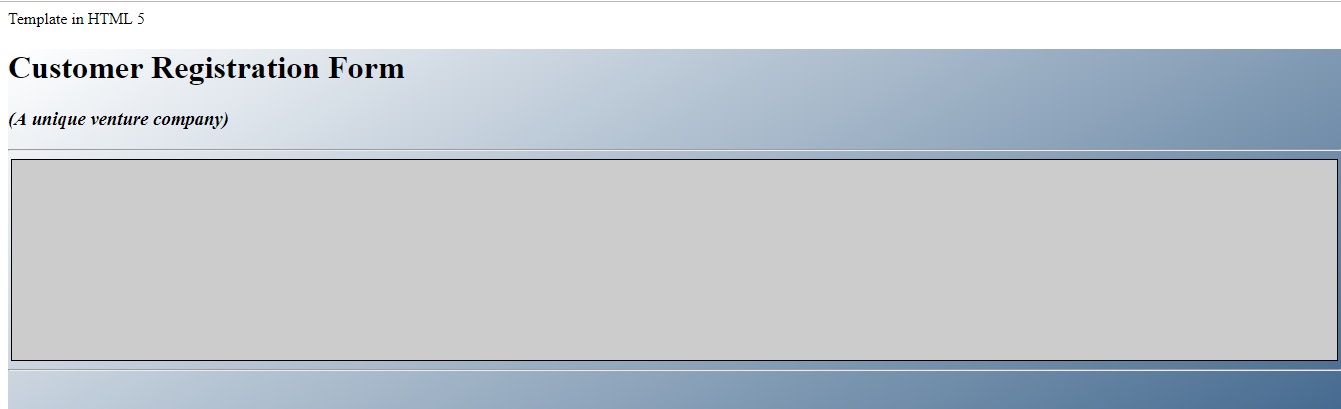
Objective: To make the Custom HTML form tag by Custom Element in HTML 5.
Step 1: We have created the Custom Element named “nice-form” with certain attributes such as “header” and “subHeader” in index.html file.
index.html | to define the HTML with custom element named “nice-form”
<script src="index.js"></script>
<body onload="loadTmplBody();">
    <template id="tmplId" >
        Template in HTML 5
        <div id="firstdivId">
            <nice-form header="Customer Registration Form" subHeader="A unique venture company" id="niceformId" >

            </nice-form>
        </div>
    </template>
</body>
Step 2: After that, we have created the Class and associate the Class with the Custom Element in JS file.
index.js | to define the class for the custom element
function loadTmplBody(){
    var tmpl = document.querySelector("#tmplId");
    tmpl.content.querySelector("#firstdivId").style = "width:100%; height:800px;background: linear-gradient(to bottom right, #ffffff 0%, #003366 100%);";
    var clonTmpl = tmpl.content.cloneNode(true);
    document.body.appendChild(clonTmpl);
}
class NiceFormClass extends HTMLElement{
    constructor(){
        super();

        this.innerHTML = `
<h1>${this.header}</h1>


<h3><i>(${this.subHeader})</i></h3>

                          <hr/>

<div style="border-style: solid; border-width: 1px; margin-left:3px; border-color: black;background-color:#ccc; width:99.4%;height:200px;"></div>

                          <hr/>
                         `;

    }

    get header(){
        return this.getAttribute('header');
    }

    set header(val){
        this.setAttribute('header', val);
    }

    get subHeader(){
        return this.getAttribute('subHeader');
    }

    set subHeader(val){
        this.setAttribute('subHeader', val);
    }

}

customElements.define('nice-form', NiceFormClass);
We have created a JS Class named “NiceFormClass” for the custom element “nice-form”. As well as we have defined getter and setter methods for header & subHeader properties. We have declared the innerHTML into the constructor of the class to render the HTML when custom element will be executed.
Result
Advantages of Using Custom Element
You can create own custom tag in HTML along with this you can also create API for your own HTML elements.
Re-usability has been increased due to the use of custom element. You can create common custom element and reuse this custom element in the HTML applications.
![]()