There are many tools to develop Lightning Web Component. In this session, we will see how to set up Visual Studio Code for developing Lightning Web Component.
Step 1: Need to install Salesforce CLI (Command Line Interface) using the following link
Windows 32 bit OS -> https://sfdc.co/sfdx_cli_win
Windows 64 bit OS -> https://sfdc.co/sfdx_cli_win64
macOS -> https://sfdc.co/sfdx_cli_osx
We will focus on how to set up Visual Studio Code in Windows OS. However, you can set up the Visual Studio Code in macOS.
Step 2: Please set the environment variable in a path in the “Advance Settings” of “My Computer“.
Step 3: Please open the Command Prompt and write “sfdx” and enter. You will see the output like the following image.
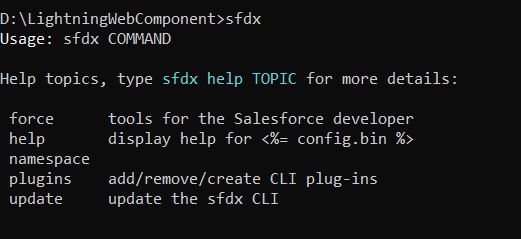
If you want to see the version of Salesforce CLI, you can enter “sfdx –version“.
Whoever has installed the Salesforce CLI before Spring 19 release, please uninstall and update the Salesforce CLI with the following commands.
sfdx plugins:uninstall salesforcedx
sfdx update
Step 4: Please install the Visual Studio Code from here.
Step 5: Launch Visual Studio Code and Please install the extension named “Salesforce Extension Pack” as per the following image.

Please activate the extension.
Step 6: Please open the Command Palette by Ctrl + Shift + P in the Visual Studio Code and enter SFDX. You will get the SFDX commands just like:

Step 7: Open the Command Palette and search SFDX: Create Project. Just select this and enter Project Name which will be created as part of the SFDX project.
Step 8: Need to connect and authorize the development org. Again Open the Command Palette and search SFDX: Authorize an Org. It will automatically open the default browser where you need to enter the user name and password for your Salesforce Development Org. After authentication, click Allow to successful handshaking between Salesforce and visual Studio Code.
Step 9: Up to this, we have created a project and connected a development org through Visual Studio Code. Now, we will create a Lightning Web Component. Again we need to open Command Palette and search SFDX: Create Lightning Web Component. Press enter to allow the default location and after this enter component name. Remember, all Lightning Web Components will be created under force-app/main/default/lwc.
Here we have created a Lightning Web Component named “welcomeWindow” under “LWCPro” project.

Step 10: We will get three sub-files such as welcomeWindow.html, welcomeWindow.js, welcomeWindow.js-meta.xml for the Lightning Web Component named “welcomeWindow“. Please refer to the next session about the detailed discussion on this Lightning Web Component. For now, we are going to update the sub-files.
welcomeWindow.html
<template>
    <lightning-card title="Welcome My Friends">
        <lightning-layout>
                <lightning-layout-item flexibility="auto" padding="around-small">
                        Welcome to LWC Training Class
                </lightning-layout-item>
            </lightning-layout>
    </lightning-card>
</template>
welcomeWindow.js — currently we will not touch this JS.
welcomeWindow.js-meta.xml — need to update this file to set the visibility into Lightning App Builder.
<?xml version="1.0" encoding="UTF-8"?>
<LightningComponentBundle xmlns="http://soap.sforce.com/2006/04/metadata" fqn="welcomeWindow">
    <apiVersion>45.0</apiVersion>
    <isExposed>true</isExposed>
    <targets>
        <target>lightning__AppPage</target>
        <target>lightning__RecordPage</target>
        <target>lightning__HomePage</target>
    </targets>
</LightningComponentBundle>
Step 11: Now, we need to deploy the component. Please do right click on the Component Name from the left side panel of Visual Studio Code and you will find out the command to deploy like SFDX: Deploy Source To Org. After selection of this command, the respective Lightning Web Component will be deployed. If you will get this type of output with exit code 0 in the Visual Studio Code Output Section, that means deployment is successful.

Step 12: Ensure that “My Domain” has been enabled in your Org.
Step 13: Create a Lightning App Page from Lightning App Builder and place the component into the Lightning App Page. Drag this component into the Lightning App page and save & activate it.
Result

![]()