Now, we will see how to update a record using UI API.
In this example, we will update the logged-in user record by using uiRecordApi which is a part of the UI API.
So, we have built a LWC named “updateUIRecord“.
Step 1: As per previous examples, we need to update the “updateUIRecord.js-meta.xml” file to set the visibility in Lightning App Builder.
updateUIRecord.js-meta.xml
<?xml version="1.0" encoding="UTF-8"?>
<LightningComponentBundle xmlns="http://soap.sforce.com/2006/04/metadata" fqn="updateUIRecord">
    <apiVersion>45.0</apiVersion>
    <isExposed>true</isExposed>
    <targets>
        <target>lightning__AppPage</target>
        <target>lightning__RecordPage</target>
        <target>lightning__HomePage</target>
    </targets>
</LightningComponentBundle>
Step 2: Need to write the respective HTML file.
updateUIRecord.html
<template>
    <lightning-card title="Update Record(User) by UIRecordAPI">
        <lightning-layout>
            <lightning-layout-item flexibility="auto" padding="around-small">
                <lightning-input label="Company Name" onchange={handleChange}></lightning-input>
                <lightning-input label="Department" onchange={handleChange} class="slds-m-bottom_x-small"></lightning-input>
                <lightning-button label="Update Record" variant="brand" onclick={updateUser}></lightning-button>
            </lightning-layout-item>
        </lightning-layout>
    </lightning-card>
</template>
Step 3: Now, we need to work on the JS file.
updateUIRecord.js
import { LightningElement } from 'lwc';
import {updateRecord} from 'lightning/uiRecordApi';
import { ShowToastEvent } from 'lightning/platformShowToastEvent';
import USER_COMPANY_NAME from '@salesforce/schema/User.CompanyName';
import USER_DEPARTMENT from '@salesforce/schema/User.Department';
import USER_ID from '@salesforce/schema/User.Id';
import CURRENTUSERID from '@salesforce/user/Id';

export default class UpdateUIRecord extends LightningElement {

    companyName;
    department;

    handleChange(event){
        this.fieldValue = event.target.value;
        if(event.target.label === "Company Name" && this.fieldValue !=='' && this.fieldValue !== undefined)
            this.companyName = this.fieldValue;
        else if(event.target.label === "Department" && this.fieldValue !=='' && this.fieldValue !== undefined)
            this.department = this.fieldValue;
    }

    updateUser(){

        const fields = {};
        fields[USER_ID.fieldApiName] = CURRENTUSERID;
        fields[USER_COMPANY_NAME.fieldApiName] = this.companyName;
        fields[USER_DEPARTMENT.fieldApiName] = this.department;

        const userRecordInput = { fields };

        updateRecord(userRecordInput)
            .then(()=> {
                this.dispatchEvent(
                    new ShowToastEvent({
                        title: 'Success',
                        message: 'User: '+CURRENTUSERID +' has been updated.',
                        variant: 'success',
                    }),
                );
            })
            .catch(error => {
                this.dispatchEvent(
                    new ShowToastEvent({
                        title: 'Error updating record',
                        message: error.body.message,
                        variant: 'error',
                    }),
                );
            });

    }
}
The procedure is same as createRecord from uiRecordAPI. Only, we need to import updateRecord from uiRecordAPI and we don’t need to set the Object API Name because we are sending the User Record Id into the fields which have been used in updateRecord.
Step 4: At last, need to add this LWC into Lightning App/Home or Record Page.
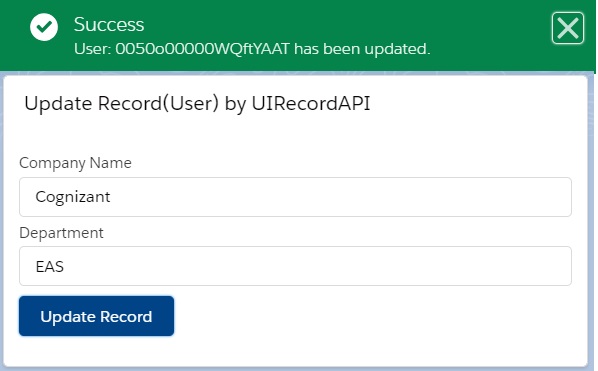
Result
In this way, we can use deleteRecord adapter to delete the record.
![]()