Most Powerful Component – lightning-record-edit-form.
Using this component, we can show and edit the record in a customized way. We can override the Save functionality and override the default behavior using this component. We can use lightning-input-field as well as lightning-output-field component into this component. It also doesn’t support all Standard objects like Event, Task.
In this exercise, we will see how to create a Contact record using lightning-record-edit-form.
So, we have built a LWC named “createLREFRecord“.
Step 1: As per previous examples, we need to update the “createLREFRecord.js-meta.xml” file to set the visibility in Lightning App Builder.
createLREFRecord.js-meta.xml
<?xml version="1.0" encoding="UTF-8"?>
<LightningComponentBundle xmlns="http://soap.sforce.com/2006/04/metadata" fqn="createLREFRecord">
    <apiVersion>45.0</apiVersion>
    <isExposed>true</isExposed>
    <targets>
        <target>lightning__AppPage</target>
        <target>lightning__RecordPage</target>
        <target>lightning__HomePage</target>
    </targets>
</LightningComponentBundle>
Step 2: Need to write the respective HTML file.
createLREFRecord.html
<template>
    <lightning-card title="Create Record(Contact) by Lightning Record Edit Form"  icon-name="standard:contact">
        <div class="slds-m-around_medium">
            <lightning-record-edit-form object-api-name="Contact"
                                        fields={fields}
                                        onsuccess={handleSuccess}>
                <lightning-messages></lightning-messages>

                <template if:true={fields}>
                    <template for:each={fields} for:item="field">
                        <div key={field}>
                            <lightning-input-field field-name={field}></lightning-input-field>
                        </div>
                    </template>
                </template>

                <div class="slds-m-top_medium">
                    <lightning-button variant="brand"
                                    type="submit"
                                    name="save"
                                    label="Save">
                    </lightning-button>
                </div>
            </lightning-record-edit-form>
        </div>
    </lightning-card>
</template>
Here, we have used lightning-record-edit-form component along with lightning-input fields. Only we are taking Contact Last Name to create a Contact record.
Step 3: Now, we need to work on the JS file.
createLREFRecord.js
import { LightningElement } from 'lwc';
import { ShowToastEvent } from 'lightning/platformShowToastEvent';
import Contact_LAST_NAME_FIELD from '@salesforce/schema/Contact.LastName';

export default class CreateLREFRecord extends LightningElement {

     fields = [Contact_LAST_NAME_FIELD];

    handleSuccess(event){
        const contactId = event.detail.id;
        if(this.recordId !== null){
            this.dispatchEvent(new ShowToastEvent({
                    title: "SUCCESS! ",
                    message: "Recod "+ contactId +" has been saved.",
                    variant: "success",
                }),
             );

        }
    }

}
Here, we have defined fields array which will be set to the property “fields” referred into the lightning-record-edit-form.
We can control the event after successfully saving the record by this component. Here we have invoked handleSuccess(event) function during onsuccess event which is set into the lightning-record-edit-form. handleSuccess(event) function is dedicated to show the toast messages as of now, but you can do other operations after successful saving the record in this function.
Step 4: At last, need to add this LWC into Lightning App/Home or Record Page. Or, you can call this component from another component.
Result
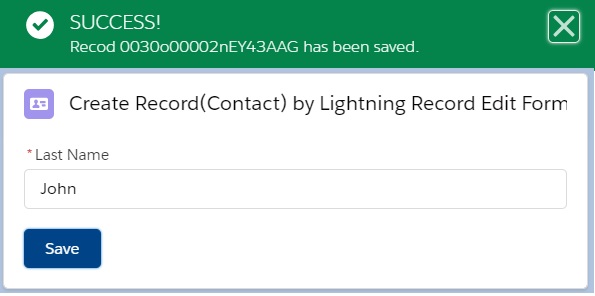
If you will see the HTML file, we have created a Save button in lightning-record-edit-form. The type of this button is “submit“. Because this button is present into the lightning-record-edit-form, we don’t need to write save function explicitly. But, you can override this behavior. Sometimes, you need to place this button outside of lightning-record-edit-form, at this point of time, you need to invoke the following operation into the respective JS file
handleSubmit(event){
   const fields = event.detail.fields;
   this.template.querySelector('lightning-record-edit-form').submit(fields);
}
We can call the standard “submit” function with defined fields to save the record as well as override default behavior.
We can also call this function during onsubmit of lightning-record-edit-form like onsubmit={handleSubmit}. Basically, lightning-record-edit-form has the following standard event handlers such as “onsubmit”, “onsuccess”, “onerror”.
Only lookup type from this component is supported in Lightning Experience, but this lookup type is not supported in Mobile App. In the Mobile App, lookup type will be represented as input text field as of now.
![]()