
What is Document Object Modal(DOM)?
DOM is nothing but a programming API for HTML and XML documents. DOM is the logical structure(i.e., tree) of the documents.
Now question is, how can we update the DOM structure created by pre-defined Lightning Component?
Yes, we can manage and update the pre-defined DOM Structure by Custom Rendering functionality provided by Lightning Component Framework in Salesforce.
Salesforce Lightning Component Framework has provided us four phases of Rendering.
| render() | afterRender() | rerender() | unrender() |
|---|---|---|---|
| To override the base render() function after component initialization. | To update the DOM tree after inserted DOM elements by render() function. | This is triggered due to anything change to the components. | It is called by the framework when a component is being destroyed. |
| Need to call superRender() function. | Need to call superAfterRender() function. | Need to call superRerender() function. | Need to call superUnrender() function. |
| It returns value (DOM or NULL). | Generally, it does not return a value. | Generally, it does not return a value. | Generally, it does not return a value. |
| event is not supported as a function parameter. | event is not supported as a function parameter. | event is not supported as a function parameter. | event is not supported as a function parameter. |
| anything needs to be changed during default rendering. | If DML operation is needed during component initialization, put logic in afterRender() function instaed of writing in init() function. | It is triggered if anything is changed to the components just like button disable after clicked the button to show some results. | If any component is not displayed due to aura:if condition is not satisfied or component is not displayed conditionally, at that point unrender() function of this component will be fired. |
| render : function(component, helper) { var ret = this.superRender(); // custom rendering logic here return ret; } | afterRender: function (component, helper) { this.superAfterRender(); // interact with the latest DOM tree made by render() function } | rerender : function(component, helper){ this.superRerender(); // custom rerendering logic here } | unrender: function (component, helper) { this.superUnrender(); // custom unrendering logic here } |
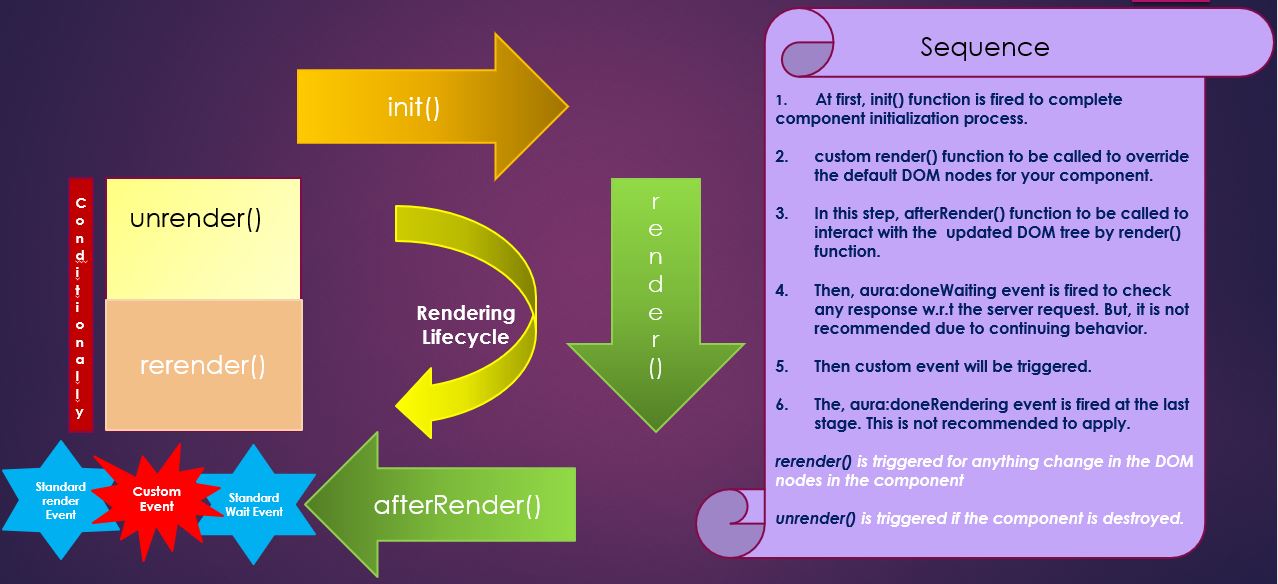
Diagram of Rendering Lifecycle
We have to create three lightning components to learning this article.
- defaultLightningPanel
- showContacts [In this learning, we will not describe how to write “showContacts” component. You can write this Lightning Component using lightning:dataTable]
- renderingLifecycle
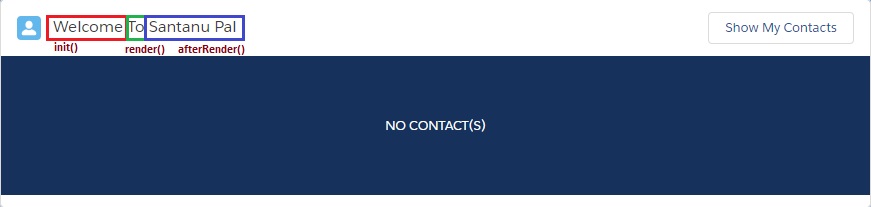
Below images depicts our assignments: [At the time of opening the table, User can see the Welcome message and when User will click on “Show My Contacts” button, user will see all the contacts created by that user.]

Step 1: Create a Lightning Component Bundle named “defaultLightningPanel“.
defaultLightningPanel.cmp | to show the default message in the contacts panel.
<aura:component>
         <aura:attribute name="displayMessage" type="String"/>
         <lightning:layout multiplerows="true" verticalalign="center">
              <lightning:layoutItem padding="around-small" size="12">
                <div class="slds-align_absolute-center">
                  <label class="slds-text-color_inverse">{!v.displayMessage}</label>
                </div>
              </lightning:layoutItem>
          </lightning:layout>
</aura:component>
Step 2: we need to focus on defaultLightningPanelRenderer.js file to understand unrender functionality.
defaultLightningPanelRenderer.js | when this component is destroyed, unrender() function will be invoked. Later we will discuss in detail.
({
	unrender : function(component, helper) {
        this.superUnrender();
        console.log("---entry in unrender---");
        component.set("v.displayMessage","My Contact(s)");


    },
})
Step 3: Create a Lightning Component named “showContacts” in where you can pass the logged in User’s Id and returns the list of Contacts with respect to User Id. [In this learning, we will not describe how to write “showContacts” component. You can write this Lightning Component using lightning:dataTable]
Step 4: Create a Lightning Component Bundle named “renderingLifecycle“.
renderingLifecycle.cmp | to show the Contacts Panel
<aura:component implements="flexipage:availableForAllPageTypes" controller="RenderingLifecycleController">

            <aura:attribute name="welcomeMsg" type="String" description="to store the Welcome Message"/>
            <aura:attribute name="userName" type="String" description="to store the name of the logged in user"/>
            <aura:attribute name="userId" type="String" description="to store the name of the logged in user"/>
            <aura:attribute name="headerLine" type="String" description="to show the header of Welcome Panel"/>
            <aura:attribute name="contactObj" type="Object" description="define the instance of Contact object"/>
            <aura:attribute name="contactColumns" type="List" description="define the columns to visible in lightning dataTable"/>
            <aura:attribute name="showContacts" type="Boolean" description="to control the show contacts panel"/>
            <aura:attribute name="defaultMessage" type="String" default="NO CONTACT(S)" description="default message"/>

            <aura:handler name="init" value="{!this}" action="{!c.doInit}"/>

            <lightning:card title="">
               <aura:set attribute="title">
                    <lightning:icon iconName="standard:avatar" size="small"/>
                    <span style="font-size: 1rem" class="slds-m-left_small"> {!v.headerLine}</span>
               </aura:set>
               <aura:set attribute="actions">
                      <lightning:button label="Show My Contacts" onclick="{!c.showMyContacts}"
                                        aura:id="showContactsBtnId"/>
               </aura:set>
               <aura:if isTrue="{!v.showContacts}">
                   <div style="padding:0.5rem;background: rgb(22, 50, 92);">
                        <label class="slds-text-color_inverse">{!v.defaultMessage}</label>
                   </div>
                   <c:showContacts userId="{!v.userId}"/>
                   <aura:set attribute="else">
                        <c:defaultLightningPanel displayMessage="{!v.defaultMessage}"/>
                   </aura:set>
                </aura:if>
             </lightning:card>
</aura:component>
Step 5: Update the controller.js file.
renderingLifecycleController.js | doInit() function is invoked ans set the value of welcomeMsg attribute as “Welcome”.
When you will press “Show My Contacts” button, we have set the Boolean variable as “showContacts” as true to open the Contacts Panel with Contact records.
({
	doInit : function(component, event, helper) {
		console.log("---entry in init---");
                component.set("v.welcomeMsg", "Welcome ");
	},

	showMyContacts : function(component, event, helper){
               component.set("v.showContacts", true);
	}
})
Step 6: Update the helper.js file
renderingLifeCycleHelper.js | to show the contact records with respect to logged in User Id
({
performShowingLoggedInUserDetails : function(component) {
var action = component.get("c.getloggedinuserDetails");
this.setShowingLoggedInUserDetails(component, action);
$A.enqueueAction(action);
},
setShowingLoggedInUserDetails : function(component, action){
action.setCallback(this, function(response){
this.handleShowingLoggedInUserDetails(component, response);
});
},
handleShowingLoggedInUserDetails : function(component, response){
var responseState = response.getState();
var responseError = response.getError();
var responseValue = response.getReturnValue();
switch(responseState){
default: break;
case 'NEW': break;
case 'RUNNING': break;
case 'SUCCESS':
if(typeof responseValue != undefined &amp;&amp; responseValue.length &gt; 0){
component.set("v.userId", responseValue[0].Id);
component.set("v.userName", responseValue[0].Name);
}
component.set ("v.headerLine", component.get("v.welcomeMsg") + component.get("v.userName"));
case 'INCOMPLETE': break;
case 'ERROR':
console.log('Response Error--&gt;'+JSON.stringify(responseError));
break;
}
},
})
Step 7: update the render.js file
renderingLifecycleRenderer.js
render() function is called after completion of doInit() function by component. By doInit() function, “welcomeMsg” attribute has been set to “Welcome“, now by render() function we have appended the value of “welcomeMsg” attribute as “To“.So, final value of “welcomeMsg” attribute has been set to “Welcome To” after completion of render() function.
After execution of render() function, afterRender() function will be invoked and the respective helper function “performShowingLoggedInUserDetails()” will be called to execute the server action to fetch the logged in User Name and concatenate the string with User Name, just like “Welcome To Santanu Pal“.
So, whenever the value of “welcomeMsg” attribute has been changed, the rerender() function will be triggered. For learning purpose, we will disable the button when “Show My Contacts” button has been pressed. In this case, the button’s visibility is controlled by a Boolean variable named “showContacts”.
({
	render : function(component, helper) {
        console.log("---entry in render---");
    	var ret = this.superRender();
    	component.set("v.welcomeMsg",component.get("v.welcomeMsg")+"To ");
    	return ret;
	},

    afterRender : function(component, helper){
        console.log("---entry in afterRender---");
        this.superAfterRender();
        helper.performShowingLoggedInUserDetails(component);
    },

    rerender : function(component, helper){
        console.log("---entry in rerender---");
        this.superRerender();
        if(component.get("v.showContacts")){
            var showContactcsBtnId = component.find("showContactsBtnId");
            showContactcsBtnId.set("v.disabled", true);
        }
    },


})
Step 8: Please call the “renderingLifecyle” component from Lightning Application.
Console Statements
As per the Rendering Lifecycle, if we want to print console.log, this log will be generated in such a way:
At the time of loading the Lightning Application
—entry in init—
—entry in render—
—entry in afterRender—
—entry in rerender—
The last rerender function() is called because at the time of running render() function, the value of “welcomeMsg” attribute has been changed.
After clicked “Show My Contacts” button.
—entry in rerender—
—entry in unrender—
—entry in rerender—
unrender() function of defaultLightningPanel component is invoked when this component is destroyed from “renderingLifeCycle” component. If you see this component this panel will be invoked when “showContacts” is false(by default nature). Now, when we clicked “Show My Contacts” button”, “showContacts” boolean variable has been set to true and the “defaultLightningPanel” Lightning Component is hidden/destroyed and “showContacts” component will be opened. As “defaultLightningPanel” Lightning Component is hidden/destroyed, the unrender() function of this component will be trigerred.
![]()