
Lightning Events are used to communicate to direct Lightning Components or indirect Lightning Components in Lightning Framework.
Component Event: This type of event can be fired from a Component and on other side, the component in the same hierarchy will handle/receive the event. Both components are correlated or coupled or directly connected.

Application Event: This type of event can be fired from a component and other component will receive/handle the event in the application. But, the components are not in the hierarchy model as well as components are not correlated or indirectly connected. You can refer this as Publish-Subscribe model.

Component Event Communication Rules:
1. Create Component Event(.evt) and declare the specific attributes as per business.
2. Register the Event into the notifier component where this event will be fired/triggered.
3. Receive the Event into the handler component where the value of Event attributes will be passed.
4. Both Notifier and Handler Components are in the same component hierarchy.
Let’s start with Component Event
Step 1: Create a Component Event named “componentEvent“.
componentEvent.evt | defines the component event
<aura:event type="COMPONENT" description="Component Event template">
   <aura:attribute name="message" type="String"/>
</aura:event>
Step 2: Create a notifier component bundle “notifier” where Event will be registered and fired.
notifier.cmp | register the component event
<aura:component>
      <!-- register Event -->
      <aura:registerEvent name="componentEvent" type="c:componentEvent"/>


<div class="slds-align_absolute-center slds-m-top_large">
         <lightning:button variant="brand" label="Submit (in notifier)" value="Trigger Event" onclick=" {!c.fireEvent}"/>
      </div>


</aura:component>
notifierController.js | fired the component event
({
	fireEvent : function(component, event, helper) {
	    var componentEvent = component.getEvent("componentEvent");
            componentEvent.setParams({
                "message":"Event: ComponentEvent is fired."
            });
            componentEvent.fire();
	}
})
Step 3: Create a handler component bundle “handler” where the value of Event attributes will be passed.
handler.cmp | handler function is called
<aura:component>
 <aura:attribute name="notificationMsg" type="String"/>
 <aura:handler name="componentEvent" event="c:componentEvent" action="{!c.receivesEvent}"/>
 <c:notifier/>


<div class="slds-align_absolute-center slds-m-top_medium">
    <b>{!v.notificationMsg}</b>
 </div>


</aura:component>
handlerController.js | receives the triggered event
({
	receivesEvent : function(component, event, helper) {
	     var message = event.getParam("message");
             component.set("v.notificationMsg", message +' (in handler)');
        }
})
Step 4: Calling the handler from Lightning App named “LearnLightning“.
LearnLightning.app | To call the handler component from this application
<aura:application extends="force:slds>
    <c:handler/>
</aura:application>
Step 5: Results
From handler component, we are calling notifier component. So, both notifier and handler are in the same hierarchy.
We are registering the event into notifier and getting the result from handler component.
- Submit button in notifier component

- After clicked on Submit button, handler component receives the message from notifier by Component Event.

Application Event Communication Rules:
1. Create Application Event(.evt) and declare the specific attributes as per business.
2. Register the Event into the transmitter component where this event will be transmitted.
3. Receive the Event into the receiver component where the value of Event attributes will be passed.
4. Both Transmitter and Receiver component are not in same component hierarchy.
Let’s start with Application Event
Step 1: Create a Application Event named “applicationEvent“.
applicationEvent.evt | defines Application Event
<aura:event type="APPLICATION" description="Application Event template">
 <aura:attribute name="message" type="String"/>
</aura:event>
Step 2: Create a transmitter component bundle “transmitter” where Event will be registered and transmitted.
transmitter.cmp | register the application event
<aura:component>
       <!-- register Event -->
       <aura:registerEvent name="applicationEvent" type="c:applicationEvent"/>


<div class="slds-align_absolute-center slds-m-top_large">
          <lightning:button variant="brand" label="Submit (in transmitter)" value="Transmit Event" onclick=" {!c.transmitEvent}"/>
       </div>


</aura:component>
transmitterController.js | transmitted the component event
({
	transmitEvent: function(component, event, helper) {
		var applicationEvent = $A.get("e.c:applicationEvent");
                applicationEvent.setParams({
                   "message":"Event: Application Event is transmitted."
                });
                applicationEvent.fire();
	}
})
Step 3: Create a receiver component bundle “receiver” where the value of Event attributes will be passed.
receiver.cmp | handler function is called
<aura:component>
    <aura:attribute name="notificationMsg" type="String"/>
    <aura:handler event="c:applicationEvent" action="{!c.receivesEvent}"/>


<div class="slds-align_absolute-center slds-m-top_large">
       <lightning:card title="Receiver">
          <b>{!v.notificationMsg}</b>
       </lightning:card>
    </div>


</aura:component>
receiverController.js | receives the transmitted event
({
	receivesEvent : function(component, event, helper) {
	     var message = event.getParam("message");
             component.set("v.notificationMsg", message);
        }
})
Step 4: Calling both transmitter and receiver components from Lightning App named “LearnLightning“.
LearnLightning.app
<aura:application extends="force:slds">
    <c:transmitter/>

    <c:receiver/>
</aura:application>
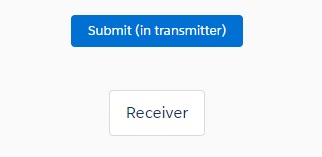
Step 5: Results
We are calling both components such as “transmitter” and “receiver” from the application. Both transmitter and receiver are not in the same hierarchy and they are disconnected in the application.
- Submit button is in transmitter component. Receiver component is waiting for transmitted message from transmitter.
- After clicked on Submit button, application event is transmitted. Receiver component is always checking that any request is coming or not from transmitter. When application event is received, Receiver prints the message transmitted from transmitter.

![]()