Custom Event is used in Lightning Web Components(LWC) to make the communication from Child Component to Parent Component in the containment hierarchy. Lightning Web Components can create and dispatch custom events.
Custom Event Rules
- To create custom events in LWC, need to use CustomEvent() constructor which will contain one required parameter as Custom Event Name and the detail of the event. It will pass any kind of data using detail property.
- To dispatch custom events in LWC, need to use EventTarget.dispatchEvent() method.
- To listen the event, we have two types such as Event Listener in Declaratively and Event Listener in Programmatically.
- We need to add “on” in prefix in the event name in Parent Component during calling of Child Component to make the Event Listener in Declaratively.
- We need to make the event listener using this.template.addEventListener() or this.addEventListener() in the constructor() of the Parent Component’s JS file as the part of Event Listener in Programmatically.
Let’s see how we will use custom event.
Step 1: First, we will create a child component named “childComponent”.
We will update the childComponent.html.
childComponent.html
<template>
    <lightning-button label="Yes, Papa" onclick={handleResponse}></lightning-button>
</template>
Here, we have declared one lightning-button by which user can send the label of the button to the parent component by handleResponse method.
We need to update childComponent.js file.
import { LightningElement } from 'lwc';

export default class ChildComponent extends LightningElement {
    handleResponse(event) {
        event.target.disabled = true;
        const btnName = event.target.label;
        const answerEvent = new CustomEvent("answer", { detail: btnName });
        this.dispatchEvent(answerEvent);
    }
}
Here we have defined a method named handleResponse() which has standard event attribute. As per the standard rule of Custom Event creation, we have used CustomEvent() constructor where we have declared the custom event as “answer” and this event will send the label of button (‘Yes, Papa’) via detail property. After that, we have dispatched the custom event using dispatchEvent() method. event.target.disabled equals to true to change the state of the button as disabled after clicked once.
Step 2: Now need to define Parent Component. So, we are going to create a parent component named as “parentComponent”.
We need to update the parentComponent.js-meta.xml to set the visibility into Lightning App Builder.
parentComponent.js-meta.xml
<?xml version="1.0" encoding="UTF-8"?>
<LightningComponentBundle xmlns="http://soap.sforce.com/2006/04/metadata" fqn="parentComponent">
     <apiVersion>45.0</apiVersion>
     <isExposed>true</isExposed>
     <targets>
        <target>lightning__AppPage</target>
        <target>lightning__RecordPage</target>
        <target>lightning__HomePage</target>
     </targets>
</LightningComponentBundle>
Then, we need to work on parentComponent.html file.
parentComponent.html
<template>
        <lightning-card title="Custom Event Communication">
          <lightning-layout>
            <lightning-layout-item flexibility="auto" padding="around-small">
              <div class="padding-around:small">
                {question}
              </div>
              <div class="answClass">
                {answer}
              </div>
              <div class="slds-m-top_medium">
                <c-child-component onanswer={handleAnswer}></c-child-component>
              </div>
            </lightning-layout-item>
          </lightning-layout>
        </lightning-card>
</template>
Here, we have called the child component and used event listener declaratively. We need to add prefix as “on” before the custom event name. As we discussed earlier, we have created a custom event named “answer”. So, in parent component we need to invoke the event listener as handleAnswer using onanswer attribute.
After that, we need to update the parentComponent.js file.
parentComponent.js
import { LightningElement, track } from 'lwc';

export default class ParentComponent extends LightningElement {
    @track answer = "Child: ";
    question = "Parent: Have you completed study for today?";

    handleAnswer(event) {
      /*eslint-disable-next-line*/
      console.log("res-->" + event.detail);
      const res = event.detail;
      this.answer = this.answer + res;
    }
}
In the handleAnswer() method, we can get the detail of the event using event.detail.
Now, to make the beautiful UI, we have created on CSS file named parentComponent.css.
parentComponent.css
.answClass {
    color: green;
    font-weight: bold;
  }
Result
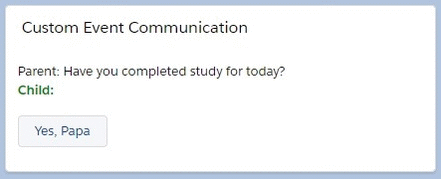
If you will see the result, parent is asking to child as “Have you completed study for today?” from parent component. Now, Child is trying to give the answer as “Yes, Papa” by clicking the button in Child Component.
How do you use the Event Listener programmatically?
If we will take the same parentComponent.js file, it looks like:
import { LightningElement, track } from 'lwc';

export default class ParentComponent extends LightningElement {
    @track answer = "Child: ";
    question = "Parent: Have you completed study for today?";

    constructor() {
      super();
      this.template.addEventListener('answer', this.handleAnswer.bind(this));
    }

    handleAnswer(event) {
      /*eslint-disable-next-line*/
      console.log("res-->" + event.detail);
      const res = event.detail;
      this.answer = this.answer + res;
    }
}
To add an event listener to an element with in a shadow boundary, please use this.template.addEventListener() method, but to add an event listener to an element that the template doesn’t own, please use this.addEventListener() method directly.
Then , need to remove onanswer attribute during the calling of the child component from parentComponent.html file.
You can set bubbles equals to true during creation of the custom event just like:
import { LightningElement } from 'lwc';

export default class ChildComponent extends LightningElement {
    handleResponse(event) {
        event.target.disabled = true;
        const btnName = event.target.label;
        const answerEvent = new CustomEvent("answer", { detail: btnName, bubbles: true });
        this.dispatchEvent(answerEvent);
    }
}
![]()