Bound Expression: {!v.attributeName}: Anything has been changed to the attribute in the Child Component affects the respective attribute in the Parent Component and vice-versa.
Unbound Expression: {#v.attributeName}: Anything has been changed to the attribute in the Child Component doesn’t affect the respective attribute in the Parent Component and vice-versa.
Following diagram depicts the use case of Bound Expression and Unbound Expression.

got the image. no 🙁 … Not an issue. Let’s we will start to discuss and again come to the this diagram
Let’s Start
Using Bound Expression
Step 1:Create a Child Component Bundle named “ChildComponent”
ChildComponent.cmp
<aura:component>
    <aura:attribute name="childAttr" type="String" description="defines child attribute"/>

<div class="slds-m-left--large">
          <b>In Child Component: </b>{!v.childAttr}
          <lightning:button variant="brand" label="Change" onclick="{!c.changeChildAttr}" class="slds-m-left--small"/>
     </div>

</aura:component>
ChildComponentController.js | This method(“changeChildAttr”) is responsible to update the value of childAttr when “Change” button will be clicked.
({
	changeChildAttr : function(component, event, helper) {
		component.set("v.childAttr", "from Child Component.")
	}
})
Step 2: Create a Parent Component Bundle named “ParentComponent”.
ParentComponent.cmp
<aura:component>
    <aura:attribute name="parentAttr" type="String" default="from Parent Component."/>

<div class="slds-m-top--large">

<div class="slds-align_absolute-center">
    		<b>In Parent Component: </b> {!v.parentAttr}
        </div>


<div class="slds-m-top--large slds-m-left--large slds-align_absolute-center">
        	<c:ChildComponent childAttr="{!v.parentAttr}"/>
        </div>

     </div>

</aura:component>
Please notice that we have used Bound Expression {!v.parentAttr} whose default value “from Parent Component” will be passed to Child Component.
Step 3: As discussed earlier, we need to create the Lightning App(“LearnLightning”) to show the Result.
LearnLightning.app
<aura:application extends="force:slds">
    <c:ParentComponent />
</aura:application>
Step 4: Results
Result 1: Just run the app. Parent Component will pass the default value as “from Parent Component” to Child Component. So, both Component will display the same value on screen as “from Parent Component”.
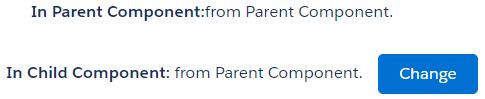
Result 2: Just run the app. Now, you can click “Change” button on Child Component.So, the value of “childAttr” has been changed to “from Child Component”. Due to Bound Expression, it will be affected to the value of “parentAttr” in Parent Component. So, both Component will display the same value on screen as “from Child Component”.
Using Unbound Expression
Step 1:Same Child Component Bundle named “ChildComponent”
ChildComponent.cmp
<aura:component>
    <aura:attribute name="childAttr" type="String"/>

<div class="slds-m-left--large">
          <b>In Child Component: </b>{!v.childAttr}
          <lightning:button variant="brand" label="Change" onclick="{!c.changeChildAttr}" class="slds-m-left--small"/>
    </div>

</aura:component>
ChildComponentController.js | This method(“changeChildAttr”) is responsible to update the value of childAttr when “Change” button will be clicked.
({
	changeChildAttr : function(component, event, helper) {
		component.set("v.childAttr", "from Child Component.")
	}
})
Step 2: Same Parent Component Bundle named “ParentComponent”.
ParentComponent.cmp
<aura:component>
    <aura:attribute name="parentAttr" type="String" default="from Parent Component."/>

<div class="slds-m-top--large">

<div class="slds-align_absolute-center">
    		<b>In Parent Component: </b>{!v.parentAttr}
        </div>


<div class="slds-m-top--large slds-m-left--large slds-align_absolute-center">
        	<c:ChildComponent childAttr="{#v.parentAttr}"/>
        </div>

     </div>

</aura:component>
Please notice that we have used Unbound Expression {#v.parentAttr} whose default value “from Parent Component” will be passed to Child Component. But, there will be no reflection from Child Component.
Step 3: Same Lightning App(“LearnLightning”) to show the Result.
LearnLightning.app
<application extends="force:slds">
    <c:ParentComponent />
</aura:application>
Step 4: Results
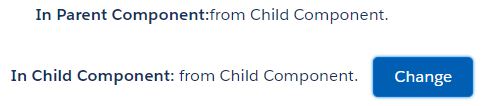
Result 1: Just run the app. Parent Component will pass the default value as “from Parent Component” to Child Component. So, both Component will display the same value on screen as “from Parent Component”.
Result 2: Just run the app. Now, you can click “Change” button on Child Component.So, the value of “childAttr” has been changed to “from Child Component”. Due to Unbound Expression, it will not change the value of “parentAttr” in Parent Component. So, Parent Component will display the value as “from Parent Component” and Child Component will display the value as “from Child Component”.
Difference between Bound Expression and Unbound Expression
| Bound Expression | Unbound Expression |
| Using this type of expression, any change to the attribute of Child Component affects the attribute of the Parent Component and Vice-Versa. | Using this type of expression, any change to the attribute of Child Component doesn’t affect the attribute of the Parent Component and Vice-Versa. |
| It is bi-directional. | It is one time uni-directional. |
| It hampers performance due to bi-directional flow. Please check component before using this type of expression. | It doesn’t hamper the performance due to one time uni-directional flow , means there is no reflection from Child Component to Parent Component and Vice-Versa. |
| It is difficult to study debug-log errors. | It is easy to track. |
| It is applicable for Component Initialization as well as Data Binding. | It is not applicable for Component Initialization as well as in any controller/helper methods. It is only applicable for Data Binding. |
Now Please go back to the first diagram of this post. Thanks 🙂
4,855 total views, 2 views today