In this session, we will learn how to use Custom Label in Lightning Web Component.
To do this exercise, We can consider the first Lightning Web Component named “welcomeWindow“.
Step 1: Need to update the welcomeWindow.js-meta.xml to set the visibility in Lightning App Builder.
welcomeWindow.js-meta.xml
<?xml version="1.0" encoding="UTF-8"?>
<LightningComponentBundle xmlns="http://soap.sforce.com/2006/04/metadata" fqn="welcomeWindow">
    <apiVersion>45.0</apiVersion>
    <isExposed>true</isExposed>
    <targets>
        <target>lightning__AppPage</target>
        <target>lightning__RecordPage</target>
        <target>lightning__HomePage</target>
    </targets>
</LightningComponentBundle>
Step 2: We have created a custom label named “Welcome_Message” where the content will be stored for welcoming.
Step 3: Need to update the JS file.
welcomeWindow.js
import { LightningElement } from 'lwc';
import WELCOME_MESSAGE from '@salesforce/label/c.Welcome_Message';

export default class WelcomeWindow extends LightningElement {
    welcomeMessage = WELCOME_MESSAGE;//'Welcome to LWC Training Class';
}
Here, we have imported Welcome_Message custom label and assign to the “welcomeMessage” property which is referred into the html file. We can import the custom label in this way
@salesforce/label/namespace.customLabelName
In our example, the default namespace is c.
Step 4: Need to update the welcomeWindow.html file.
welcomeWindow.html
<template>
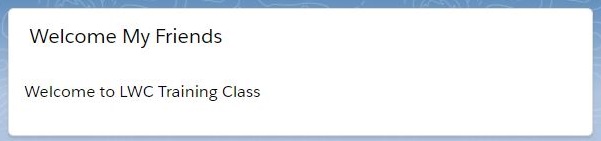
<lightning-card title="Welcome My Friends">
<lightning-layout>
<lightning-layout-item flexibility="auto" padding="around-small">
{welcomeMessage}
</lightning-layout-item>
</lightning-layout>
</lightning-card>
</template>
Here, we have used “welcomeMessage” property to display the welcome message.
Result
![]()